Update: Riverpod 3.0 was released in September 2025. To learn what's changed, read: What's new in Riverpod 3.0.
Riverpod is a reactive caching and data-binding framework that was born as an evolution of the Provider package.
According to the official documentation:
Riverpod is a complete rewrite of the Provider package to make improvements that would be otherwise impossible.
Many people still view it as a "state management" framework.
But it is much more than that.
In fact, Riverpod 2.0 borrows many valuable concepts from React Query and brings them to the Flutter world.
Riverpod is very versatile, and you can use it to:
- catch programming errors at compile-time rather than at runtime
- easily fetch, cache, and update data from a remote source
- perform reactive caching and easily update your UI
- depend on asynchronous or computed state
- create, use, and combine providers with minimal boilerplate code
- dispose the state of a provider when it is no longer used
- write testable code and keep your logic outside the widget tree
Riverpod implements well-defined patterns for retrieving and caching data, so you don't have to reimplement them.
And it also helps you establish a good app architecture (if you use it correctly), so you can focus on building features with minimal friction.
Getting started with Riverpod is easy.
But there is a bit of a learning curve if you want to use it to its full capacity, and I've created this guide to cover all the essential concepts and APIs.
How this guide is organized
To make it easier to follow, I've organized this guide into three main parts:
- Why use Riverpod, how to install it, and core concepts
- An overview of the eight different kinds of providers (and when to use them)
- Additional Riverpod features (modifiers, provider overrides, filtering, testing support, logging, etc.)
This guide is extensive and up to date, and you can use it as a reference in addition to the official documentation.
We'll explore the main Riverpod APIs and concepts using simple examples.
Where appropriate, I've included links to separate articles covering more complex, real-world examples that didn't fit here.
A new riverpod_generator package has been published as part of the Riverpod 2.0 release. This introduces a new
@riverpodannotation API that you can use to automatically generate providers for classes and methods in your code (using code generation). To learn about it, read: How to Auto-Generate your Providers with Flutter Riverpod Generator.
Ready? Let's get started! 🚀
Why use Riverpod?
To understand why we even need Riverpod, let's look at the main drawback of the Provider package.
By design, Provider is an improvement over InheritedWidget, and as such, it depends on the widget tree.
This is an unfortunate design decision that can lead to the common ProviderNotFoundException:
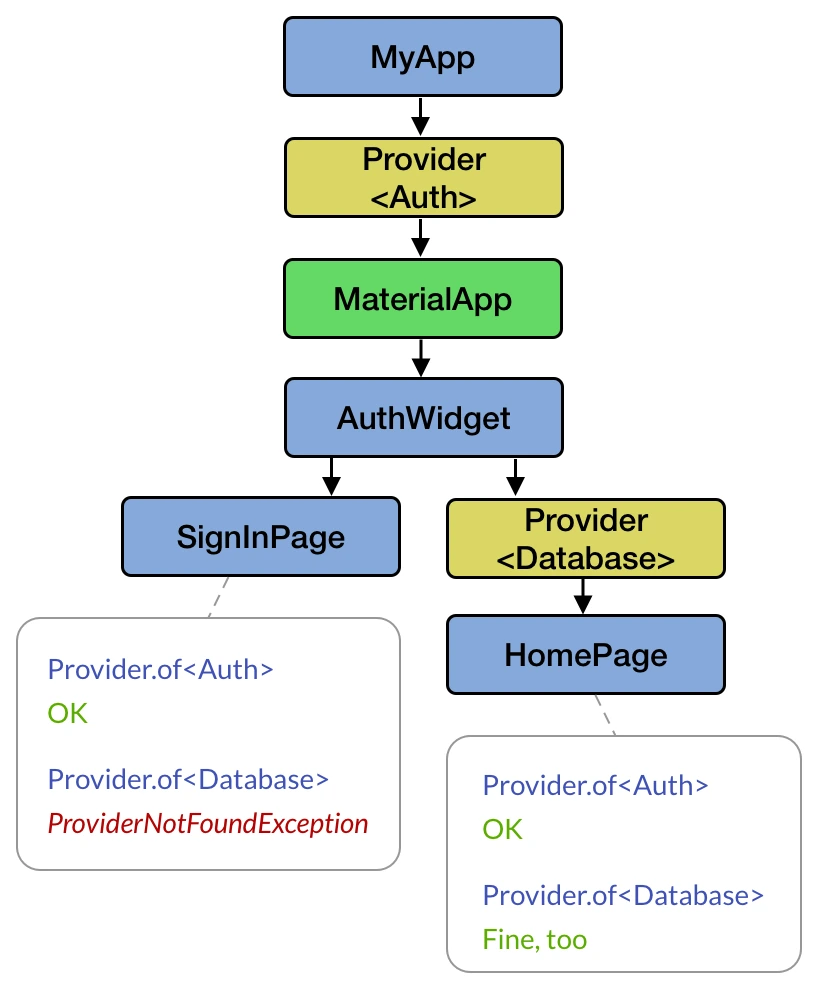
On the other hand, Riverpod is compile-safe since all providers are declared globally and can be accessed anywhere.
This means that you can create providers to hold your application state and business logic outside the widget tree.
And since Riverpod is a reactive framework, it makes it easier to only rebuild your providers and widgets when needed.
So let's see how to install and use it. 👇
Riverpod Installation
The first step is to add the latest version of flutter_riverpod as a dependency to our pubspec.yaml file:
dependencies:
  flutter:
    sdk: flutter
  flutter_riverpod: ^2.3.6
Note: If your application already uses flutter_hooks, you can install the hooks_riverpod package instead. This includes some extra features that make it easier to integrate Hooks with Riverpod. In this tutorial, we will focus on flutter_riverpod only for simplicity.
If you want to use the new Riverpod Generator, you'll need to install some additional packages. For all the details, read: How to Auto-Generate your Providers with Flutter Riverpod Generator.
Top Tip: To more easily add Riverpod providers in your code, install the Flutter Riverpod Snippets extension for VSCode or Android Studio / IntelliJ.
For more info, read the Getting started page on Riverpod.dev.
ProviderScope
Once Riverpod is installed, we can wrap our root widget with a ProviderScope:
void main() {
  // wrap the entire app with a ProviderScope so that widgets
  // will be able to read providers
  runApp(ProviderScope(
    child: MyApp(),
  ));
}
ProviderScope is a widget that stores the state of all the providers we create.
Under the hood,
ProviderScopecreates aProviderContainerinstance. Most of the time, you won't need to care aboutProviderContaineror use it directly. For more details aboutProviderContainerandUncontrolledProviderScope, read Flutter Riverpod: How to Register a Listener during App Startup.
Having completed the initial setup, we can start learning about Providers.
What is a Riverpod Provider?
The Riverpod documentation defines a Provider as an object that encapsulates a piece of state and allows listening to that state.
With Riverpod, providers are the core of everything:
- They completely replace design patterns such as singletons, service locators, dependency injection, and InheritedWidgets.
- They allow you to store some state and easily access it in multiple locations.
- They allow you to optimize performance by filtering widget rebuilds or caching expensive state computations.
- They make your code more testable, since each provider can be overridden to behave differently during a test.
So let's see how to use them. 👇
Creating and Reading a Provider
Let's get started by creating a basic "Hello world" provider:
// provider that returns a string value
final helloWorldProvider = Provider<String>((ref) {
  return 'Hello world';
});
This is made of three things:
- The declaration:
final helloWorldProvideris the global variable that we will use to read the state of the provider - The provider:
Provider<String>tells us what kind of provider we're using (more on this below), and the type of the state it holds. - A function that creates the state. This gives us a
refparameter that we can use to read other providers, perform some custom dispose logic, and more.
Once we have a provider, how do we use it inside a widget?
class HelloWorldWidget extends StatelessWidget {
  @override
  Widget build(BuildContext context) {
    return Text(
      /* how to read the provider value here? */,
    );
  }
}
All Flutter widgets have a BuildContext object that we can use to access things inside the widget tree (such as Theme.of(context)).
But Riverpod providers live outside the widget tree and to read them we need an additional ref object. Here are three different ways of obtaining it. 👇
1. Using a ConsumerWidget
The simplest way is to use a ConsumerWidget:
final helloWorldProvider = Provider<String>((_) => 'Hello world');

// 1. widget class now extends [ConsumerWidget]
class HelloWorldWidget extends ConsumerWidget {
  @override
  // 2. build method has an extra [WidgetRef] argument
  Widget build(BuildContext context, WidgetRef ref) {
    // 3. use ref.watch() to get the value of the provider
    final helloWorld = ref.watch(helloWorldProvider);
    return Text(helloWorld);
  }
}
By subclassing ConsumerWidget instead of StatelessWidget, our widget's build method gets an extra ref object (of type WidgetRef) that we can use to watch our provider.
Using ConsumerWidget is the most common option and the one you should choose most of the time.
2. Using a Consumer
As an alternative, we can wrap our Text widget with a Consumer:
final helloWorldProvider = Provider<String>((_) => 'Hello world');

class HelloWorldWidget extends StatelessWidget {
  @override
  Widget build(BuildContext context) {
    // 1. Add a Consumer
    return Consumer(
      // 2. specify the builder and obtain a WidgetRef
      builder: (_, WidgetRef ref, __) {
        // 3. use ref.watch() to get the value of the provider
        final helloWorld = ref.watch(helloWorldProvider);
        return Text(helloWorld);
      },
    );
  }
}
In this case, the "ref" object is one of the Consumer's builder arguments, and we can use it to watch the value of the provider.
This works, but it's more verbose than the previous solution.
So when should we use a Consumer over a ConsumerWidget?
Here is one example:
final helloWorldProvider = Provider<String>((_) => 'Hello world');

class HelloWorldWidget extends StatelessWidget {
  @override
  Widget build(BuildContext context) {
    return Scaffold(
      appBar: AppBar(),
      // 1. Add a Consumer
      body: Consumer(
        // 2. specify the builder and obtain a WidgetRef
        builder: (_, WidgetRef ref, __) {
          // 3. use ref.watch() to get the value of the provider
          final helloWorld = ref.watch(helloWorldProvider);
          return Text(helloWorld);
        },
      ),
    );
  }
}
In this case, we're wrapping only the Text with a Consumer widget, but not the parent Scaffold:
Scaffold
├─ AppBar
└─ Consumer
    └─ Text
As a result, only the Text will rebuild if the provider value changes (more on this below).
This may seem like a small detail, but if you have a big widget class with a complex layout, you can use Consumer to rebuild only the widgets that depend on the provider. Though as I said in a previous article:
Creating widgets that are small and reusable favours composition, leading to code that is concise, more performant, and easier to reason about.
If you follow this principle and create small, reusable widgets, then you'll naturally use ConsumerWidget most of the time.
3. Using ConsumerStatefulWidget & ConsumerState
ConsumerWidget is a good replacement for StatelessWidget and gives us a convenient way of accessing providers with minimal code.
But what if we have a StatefulWidget instead?
Here's the same hello world example:
final helloWorldProvider = Provider<String>((_) => 'Hello world');

// 1. extend [ConsumerStatefulWidget]
class HelloWorldWidget extends ConsumerStatefulWidget {
  @override
  ConsumerState<HelloWorldWidget> createState() => _HelloWorldWidgetState();
}

// 2. extend [ConsumerState]
class _HelloWorldWidgetState extends ConsumerState<HelloWorldWidget> {
  @override
  void initState() {
    super.initState();
    // 3. if needed, we can read the provider inside initState
    final helloWorld = ref.read(helloWorldProvider);
    print(helloWorld); // "Hello world"
  }

  @override
  Widget build(BuildContext context) {
    // 4. use ref.watch() to get the value of the provider
    final helloWorld = ref.watch(helloWorldProvider);
    return Text(helloWorld);
  }
}
By subclassing from ConsumerStatefulWidget and ConsumerState, we can call ref.watch() in the build method just like we have done before.
And if we need to read the provider value in any of the other widget lifecycle methods, we can use ref.read().
When we subclass from
ConsumerState, we can access therefobject inside all the widget lifecycle methods. This is becauseConsumerStatedeclaresWidgetRefas a property, much like the FlutterStateclass declaresBuildContextas a property that can be accessed directly inside all the widget lifecycle methods.
If you use the hooks_riverpod package, you can also use
HookConsumerWidgetandStatefulHookConsumerWidget. The official documentation covers these widgets in more detail.
What is a WidgetRef?
As we have seen, we can watch a provider's value by using a ref object of type WidgetRef. This is available as an argument when we use Consumer or ConsumerWidget, and as a property when we subclass from ConsumerState.
The Riverpod documentation defines WidgetRef as an object that allows widgets to interact with providers.
Note that there are some similarities between BuildContext and WidgetRef:
BuildContextlets us access ancestor widgets in the widget tree (such asTheme.of(context)andMediaQuery.of(context))WidgetReflets us access any provider inside our app
In other words, WidgetRef lets us access any provider in our codebase (as long as we import the corresponding file). This is by design because all Riverpod providers are global.
This is significant because keeping application state and logic inside our widgets leads to poor separation of concerns. Moving it inside our providers makes our code more testable and maintainable. 👍
Eight different kinds of providers
So far, we have learned how to create a simple Provider and watch it inside a widget using a ref object.
But Riverpod offers eight different kinds of providers, all suited for separate use cases:
ProviderStateProvider(legacy)StateNotifierProvider(legacy)FutureProviderStreamProviderChangeNotifierProvider(legacy)NotifierProvider(new in Riverpod 2.0)AsyncNotifierProvider(new in Riverpod 2.0)
So let's review them and understand when to use them.
If you use the new riverpod_generator package, you no longer have to declare your providers manually (though I still recommend you get familiar with all eight kinds of providers). To learn more, read: How to Auto-Generate your Providers with Flutter Riverpod Generator.
1. Provider
We have already learned about this one:
// provider that returns a string value
final helloWorldProvider = Provider<String>((ref) {
  return 'Hello world';
});
Provider is great for accessing dependencies and objects that don’t change.
You may use this to access a repository, a logger, or some other class that doesn't contain mutable state.
For example, here's a provider that returns a DateFormat:
// declare the provider
final dateFormatterProvider = Provider<DateFormat>((ref) {
  return DateFormat.MMMEd();
});

class SomeWidget extends ConsumerWidget {
  @override
  Widget build(BuildContext context, WidgetRef ref) {
    // retrieve the formatter
    final formatter = ref.watch(dateFormatterProvider);
    // use it
    return Text(formatter.format(DateTime.now()));
  }
}
Provideris great for accessing dependencies that don't change, such as the repositories in our app. For more info, read: Flutter App Architecture: The Repository Pattern.
More info here:
2. StateProvider
StateProvider is great for storing simple state objects that can change, such as a counter value:
final counterStateProvider = StateProvider<int>((ref) {
  return 0;
});
If you watch it inside the build method, the widget will rebuild when the state changes.
And you can update its state inside a button callback by calling ref.read():
class CounterWidget extends ConsumerWidget {
  @override
  Widget build(BuildContext context, WidgetRef ref) {
    // 1. watch the provider and rebuild when the value changes
    final counter = ref.watch(counterStateProvider);
    return ElevatedButton(
      // 2. use the value
      child: Text('Value: $counter'),
      // 3. change the state inside a button callback
      onPressed: () => ref.read(counterStateProvider.notifier).state++,
    );
  }
}
StateProvideris ideal for storing simple state variables, such as enums, strings, booleans, and numbers.Notifiercan also be used for the same purpose and is more flexible. For more complex or asynchronous state, useAsyncNotifierProvider,FutureProvider, orStreamProvideras described below.
More info and examples here:
3. StateNotifierProvider
Use this to listen to and expose a StateNotifier.
StateNotifierProvider and StateNotifier are ideal for managing state that may change in reaction to an event or user interaction.
For example, here's a simple Clock class:
import 'dart:async';

class Clock extends StateNotifier<DateTime> {
  // 1. initialize with current time
  Clock() : super(DateTime.now()) {
    // 2. create a timer that fires every second
    _timer = Timer.periodic(Duration(seconds: 1), (_) {
      // 3. update the state with the current time
      state = DateTime.now();
    });
  }

  late final Timer _timer;

  // 4. cancel the timer when finished
  @override
  void dispose() {
    _timer.cancel();
    super.dispose();
  }
}
This class sets the initial state by calling super(DateTime.now()) in the constructor, and updates it every second using a periodic timer.
Once we have this, we can create a new provider:
// Note: StateNotifierProvider has *two* type annotations
final clockProvider = StateNotifierProvider<Clock, DateTime>((ref) {
  return Clock();
});
Then, we can watch the clockProvider inside a ConsumerWidget to get the current time and show it inside a Text widget:
import 'package:intl/intl.dart';

class ClockWidget extends ConsumerWidget {
  @override
  Widget build(BuildContext context, WidgetRef ref) {
    // watch the StateNotifierProvider to return a DateTime (the state)
    final currentTime = ref.watch(clockProvider);
    // format the time as `hh:mm:ss`
    final timeFormatted = DateFormat.Hms().format(currentTime);
    return Text(timeFormatted);
  }
}
Since we're using ref.watch(clockProvider), our widget will rebuild every time the state changes (once every second) and show the updated time.
Note:
ref.watch(clockProvider)returns the provider's state. To access the underlying state notifier object, callref.read(clockProvider.notifier)instead.
For a complete example of how and when to use StateNotifierProvider, read this article:
More info here:
As of Riverpod 2.0,
StateNotifieris considered legacy and can be replaced by the newAsyncNotifierclass. For more details, read: How to use Notifier and AsyncNotifier with the new Flutter Riverpod Generator.
Note that using StateNotifierProvider is overkill if you only need to read some async data. That's what FutureProvider is for. 👇
4. FutureProvider
Want to get the result from an API call that returns a Future?
Then just create a FutureProvider like this:
final weatherFutureProvider = FutureProvider.autoDispose<Weather>((ref) {
  // get repository from the provider below
  final weatherRepository = ref.watch(weatherRepositoryProvider);
  // call method that returns a Future<Weather>
  return weatherRepository.getWeather(city: 'London');
});

// example weather repository provider
final weatherRepositoryProvider = Provider<WeatherRepository>((ref) {
  return WeatherRepository(); // declared elsewhere
});
FutureProvideris often used with theautoDisposemodifier. Read below to learn more.
Then you can watch it in the build method and use pattern matching to map the resulting AsyncValue (data, loading, error) to your UI:
Widget build(BuildContext context, WidgetRef ref) {
  // watch the FutureProvider and get an AsyncValue<Weather>
  final weatherAsync = ref.watch(weatherFutureProvider);
  // use pattern matching to map the state to the UI
  return weatherAsync.when(
    loading: () => const CircularProgressIndicator(),
    error: (err, stack) => Text('Error: $err'),
    data: (weather) => Text(weather.toString()),
  );
}
Note: when you watch a
FutureProvider<T>orStreamProvider<T>, the return type is anAsyncValue<T>. AsyncValue is a utility class for dealing with asynchronous data in Riverpod. For more details, read this: Flutter Riverpod Tip: Use AsyncValue rather than FutureBuilder or StreamBuilder
FutureProvider is very powerful, and you can use it to:
- perform and cache asynchronous operations (such as network requests)
- handle the error and loading states of asynchronous operations
- combine multiple asynchronous values into another value
- re-fetch and refresh data (useful for pull-to-refresh operations)
More info here:
5. StreamProvider
Use StreamProvider to watch a Stream of results from a realtime API and reactively rebuild the UI.
For example, here is how to create a StreamProvider for the authStateChanges method of the FirebaseAuth class:
final authStateChangesProvider = StreamProvider.autoDispose<User?>((ref) {
  // get FirebaseAuth from the provider below
  final firebaseAuth = ref.watch(firebaseAuthProvider);
  // call a method that returns a Stream<User?>
  return firebaseAuth.authStateChanges();
});

// provider to access the FirebaseAuth instance
final firebaseAuthProvider = Provider<FirebaseAuth>((ref) {
  return FirebaseAuth.instance;
});
And here's how to use it inside a widget:
Widget build(BuildContext context, WidgetRef ref) {
  // watch the StreamProvider and get an AsyncValue<User?>
  final authStateAsync = ref.watch(authStateChangesProvider);
  // use pattern matching to map the state to the UI
  return authStateAsync.when(
    data: (user) => user != null ? HomePage() : SignInPage(),
    loading: () => const CircularProgressIndicator(),
    error: (err, stack) => Text('Error: $err'),
  );
}
StreamProvider has many benefits over the StreamBuilder widget, which are all listed here:
6. ChangeNotifierProvider
The ChangeNotifier class is part of the Flutter SDK.
We can use it to store some state and notify listeners when it changes.
For example, here's a ChangeNotifier subclass along with the corresponding ChangeNotifierProvider:
class AuthController extends ChangeNotifier {
  // mutable state
  User? user;
  // computed state
  bool get isSignedIn => user != null;

  Future<void> signOut() {
    // update state
    user = null;
    // and notify any listeners
    notifyListeners();
  }
}

final authControllerProvider = ChangeNotifierProvider<AuthController>((ref) {
  return AuthController();
});
And here's the widget build method showing how to use it:
Widget build(BuildContext context, WidgetRef ref) {
  return ElevatedButton(
    onPressed: () => ref.read(authControllerProvider).signOut(),
    child: const Text('Logout'),
  );
}
The ChangeNotifier API makes it easy to break two important rules: immutable state and unidirectional data flow.
As a result, ChangeNotifier is discouraged, and we should use StateNotifier instead.
When used incorrectly,
ChangeNotifierleads to mutable state and makes our code harder to maintain.StateNotifiergives us a simple API for dealing with immutable state. For a more in-depth overview, read: Flutter State Management: Going from setState to Freezed & StateNotifier with Provider
More info here:
New in Riverpod 2.0: NotifierProvider and AsyncNotifierProvider
Riverpod 2.0 introduced new Notifier and AsyncNotifier classes, along their corresponding providers.
I have covered them separately in this article:
When to use ref.watch vs ref.read?
In the examples above, we have encountered two ways of reading providers: ref.read and ref.watch.
To get the value of a provider inside a build method, we have always used ref.watch. This ensures that if the provider value changes, we rebuild the widgets that depend on it.
But there are cases when we shouldn't use ref.watch.
For example, inside the onPressed callback of a button, we should use ref.read instead:
final counterStateProvider = StateProvider<int>((_) => 0);

class CounterWidget extends ConsumerWidget {
  @override
  Widget build(BuildContext context, WidgetRef ref) {
    // 1. watch the provider and rebuild when the value changes
    final counter = ref.watch(counterStateProvider);
    return ElevatedButton(
      // 2. use the value
      child: Text('Value: $counter'),
      // 3. change the state inside a button callback
      onPressed: () => ref.read(counterStateProvider.notifier).state++,
    );
  }
}
As a rule of thumb, we should:
- call
ref.watch(provider)to observe a provider's state in thebuildmethod and rebuild a widget when it changes - call
ref.read(provider)to read a provider's state just once (this can be useful ininitStateor other lifecycle methods)
However, in the code above we have called ref.read(provider.notifier) and used it to modify its state.
The .notifier syntax is available with StateProvider and StateNotifierProvider only and works as follows:
- call
ref.read(provider.notifier)on aStateProvider<T>to return the underlyingStateController<T>that we can use to modify the state - call
ref.read(provider.notifier)on aStateNotifierProvider<T>to return the underlyingStateNotifier<T>so we can call methods on it
In addition to using
ref.watchandref.readinside our widgets, we can also use them inside our providers. Read below about Combining Providers with Riverpod for more info.
Alongside ref.read and ref.watch, we also have ref.listen. 👇
Listening to Provider State Changes
Sometimes we want to show an alert dialog or a SnackBar when a provider state changes.
We can do this by calling ref.listen() inside the build method:
final counterStateProvider = StateProvider<int>((_) => 0);

class CounterWidget extends ConsumerWidget {
  @override
  Widget build(BuildContext context, WidgetRef ref) {
    // if we use a StateProvider<T>, the type of the previous and current
    // values is StateController<T>
    ref.listen<StateController<int>>(counterStateProvider.state, (previous, current) {
      // note: this callback executes when the provider value changes,
      // not when the build method is called
      ScaffoldMessenger.of(context).showSnackBar(
        SnackBar(content: Text('Value is ${current.state}')),
      );
    });
    // watch the provider and rebuild when the value changes
    final counter = ref.watch(counterStateProvider);
    return ElevatedButton(
      // use the value
      child: Text('Value: $counter'),
      // change the state inside a button callback
      onPressed: () => ref.read(counterStateProvider.notifier).state++,
    );
  }
}
In this case, the callback gives us the provider's previous and current state, and we can use it to show a SnackBar.
ref.listen()gives us a callback that executes when the provider value changes, not when thebuildmethod is called. Hence we can use it to run any asynchronous code (such as showing a dialog), just like we do inside button callbacks. For more info about running asynchronous code inside Flutter widgets, read my article about side effects in Flutter.
In addition to
watch,read, andlisten, Riverpod 2.0 introduced new methods that we can use to explicitly refresh or invalidate a provider. I will cover them in a separate article.
Additional Riverpod Features
So far, we have covered most of the core concepts and the six main kinds of providers.
Next up, let's look at some additional features often needed in real-world projects using Riverpod.
The autoDispose modifier
If we're working with FutureProvider or StreamProvider, we'll want to dispose of any listeners when our provider is no longer in use.
We can do this by adding an autoDispose modifier to our provider:
final authStateChangesProvider = StreamProvider.autoDispose<User?>((ref) {
  // get FirebaseAuth from another provider
  final firebaseAuth = ref.watch(firebaseAuthProvider);
  // call method that returns a Stream<User?>
  return firebaseAuth.authStateChanges();
});
This will ensure that the stream connection is closed as soon as we leave the page where we're watching the provider.
Under the hood, Riverpod keeps track of all the listeners (widgets or other providers) attached to any given provider (either via
ref.watchorref.listen). If we useautoDispose, the provider will be disposed once all listeners are removed (that is, when the widgets are unmounted).
Another use case for autoDispose is when we're using FutureProvider as a wrapper for an HTTP request that fires when the user opens a new screen.
If we want to cancel the HTTP request when the user leaves the screen before the request is completed, we can use ref.onDispose() to perform some custom cancellation logic:
final movieProvider = FutureProvider.autoDispose<TMDBMovieBasic>((ref) async {
  // get the repository
  final moviesRepo = ref.watch(fetchMoviesRepositoryProvider);
  // an object from package:dio that allows cancelling http requests
  final cancelToken = CancelToken();
  // when the provider is destroyed, cancel the http request
  ref.onDispose(() => cancelToken.cancel());
  // call method that returns a Future<TMDBMovieBasic>
  return moviesRepo.movie(movieId: 550, cancelToken: cancelToken);
});
Caching with Timeout
If desired, we can call ref.keepAlive() to preserve the state so that the request won't fire again if the user leaves and re-enters the same screen:
final movieProvider = FutureProvider.autoDispose<TMDBMovieBasic>((ref) async {
  // get the repository
  final moviesRepo = ref.watch(fetchMoviesRepositoryProvider);
  // an object from package:dio that allows cancelling http requests
  final cancelToken = CancelToken();
  // when the provider is destroyed, cancel the http request
  ref.onDispose(() => cancelToken.cancel());
  // if the request is successful, keep the response
  ref.keepAlive();
  // call method that returns a Future<TMDBMovieBasic>
  return moviesRepo.movie(movieId: 550, cancelToken: cancelToken);
});
The keepAlive method will tell the provider to keep its state indefinitely, causing it to update only if we refresh or invalidate it.
We can even use a KeepAliveLink to implement a timeout-based caching strategy to dispose the provider's state after a given duration:
  // get the [KeepAliveLink]
  final link = ref.keepAlive();
  // start a 30 second timer
  final timer = Timer(const Duration(seconds: 30), () {
    // dispose on timeout
    link.close();
  });
  // make sure to cancel the timer when the provider state is disposed
  // (prevents undesired test failures)
  ref.onDispose(() => timer.cancel());
And if you wish to make this code more reusable, you can create an AutoDisposeRef extension (as explained here):
extension AutoDisposeRefCache on AutoDisposeRef {
  // keeps the provider alive for [duration] since when it was first created
  // (even if all the listeners are removed before then)
  void cacheFor(Duration duration) {
    final link = keepAlive();
    final timer = Timer(duration, () => link.close());
    onDispose(() => timer.cancel());
  }
}

final myProvider = Provider.autoDispose<int>((ref) {
  // use like this:
  ref.cacheFor(const Duration(minutes: 5));
  return 42;
});
Riverpod helps us solve complex problems with simple code, and it really shines when it comes to data caching. To make the most of it, read: Riverpod Data Caching and Providers Lifecycle: Full Guide
The family modifier
family is a modifier that we can use to pass an argument to a provider.
It works by adding a second type annotation and an additional parameter that we can use inside the provider body:
final movieProvider = FutureProvider.autoDispose
    // additional movieId argument of type int
    .family<TMDBMovieBasic, int>((ref, movieId) async {
  // get the repository
  final moviesRepo = ref.watch(fetchMoviesRepositoryProvider);
  // call method that returns a Future<TMDBMovieBasic>, passing the movieId as an argument
  return moviesRepo.movie(movieId: movieId, cancelToken: cancelToken);
});
Then, we can just pass the value we want to the provider when we call ref.watch in the build method:
final movieAsync = ref.watch(movieProvider(550));
We could use this when the user selects an item from a ListView of movies, and we push a MovieDetailsScreen that takes the movieId as an argument:
class MovieDetailsScreen extends ConsumerWidget {
  const MovieDetailsScreen({super.key, required this.movieId});
  // pass this as a property
  final int movieId;

  @override
  Widget build(BuildContext context, WidgetRef ref) {
    // fetch the movie data for the given movieId
    final movieAsync = ref.watch(movieProvider(movieId));
    // map to the UI using pattern matching
    return movieAsync.when(
      data: (movie) => MovieWidget(movie: movie),
      loading: (_) => Center(child: CircularProgressIndicator()),
      error: (e, __) => Center(child: Text(e.toString())),
    );
  }
}
Passing multiple parameters to a family
In some cases, you may need to pass more than one value to a family.
While Riverpod does not support this, you can pass any custom object that implements hashCode and the equality operator (such as objects generated with Freezed or objects that use equatable).
For more details, read:
To overcome this limitation, you can use the new riverpod_generator package and pass as many named or positional arguments as you like. Read this for all the details:
Dependency Overrides with Riverpod
Sometimes we want to create a Provider to store a value or object that is not immediately available.
For example, we can only get a SharedPreferences instance with a Future-based API:
final sharedPreferences = await SharedPreferences.getInstance();
But we can't return this inside a synchronous Provider:
final sharedPreferencesProvider = Provider<SharedPreferences>((ref) {
  return SharedPreferences.getInstance();
  // The return type Future<SharedPreferences> isn't a 'SharedPreferences',
  // as required by the closure's context.
});
Instead, we have to initialize this provider by throwing an UnimplementedError:
final sharedPreferencesProvider = Provider<SharedPreferences>((ref) {
  throw UnimplementedError();
});
And when the object we need is available, we can set a dependency override for our provider inside the ProviderScope widget:
// asynchronous initialization can be performed in the main method
Future<void> main() async {
  WidgetsFlutterBinding.ensureInitialized();
  final sharedPreferences = await SharedPreferences.getInstance();
  runApp(ProviderScope(
    overrides: [
      // override the previous value with the new object
      sharedPreferencesProvider.overrideWithValue(sharedPreferences),
    ],
    child: MyApp(),
  ));
}
The advantage of initializing sharedPreferences before calling runApp() is that we can watch the sharedPreferencesProvider object anywhere without using any Future-based APIs.
This example used the
ProviderScopeat the root of the widget tree, but we can also create nestedProviderScopewidgets if needed. More on this below.
For a more complex example of asynchronous app initialization, read this article:
Combining Providers with Riverpod
Providers can depend on other providers.
For example, here we define a SettingsRepository class that takes an explicit SharedPreferences argument:
class SettingsRepository {
  const SettingsRepository(this.sharedPreferences);
  final SharedPreferences sharedPreferences;

  // synchronous read
  bool onboardingComplete() {
    return sharedPreferences.getBool('onboardingComplete') ?? false;
  }

  // asynchronous write
  Future<void> setOnboardingComplete(bool complete) {
    return sharedPreferences.setBool('onboardingComplete', complete);
  }
}
Then we create a settingsRepositoryProvider provider that depends on the sharedPreferencesProvider we created above.
final settingsRepositoryProvider = Provider<SettingsRepository>((ref) {
  // watch another provider to obtain a dependency
  final sharedPreferences = ref.watch(sharedPreferencesProvider);
  // pass it as an argument to the object we need to return
  return SettingsRepository(sharedPreferences);
});
Using
ref.watch()ensures that the provider is updated when the provider we depend on changes. As a result, any dependent widgets and providers will rebuild too.
Passing Ref as an argument
As an alternative, we can pass Ref as an argument when creating the SettingsRepository:
class SettingsRepository {
  const SettingsRepository(this.ref);
  final Ref ref;

  // synchronous read
  bool onboardingComplete() {
    final sharedPreferences = ref.read(sharedPreferencesProvider);
    return sharedPreferences.getBool('onboardingComplete') ?? false;
  }

  // asynchronous write
  Future<void> setOnboardingComplete(bool complete) {
    final sharedPreferences = ref.read(sharedPreferencesProvider);
    return sharedPreferences.setBool('onboardingComplete', complete);
  }
}
This way, the sharedPreferencesProvider becomes an implicit dependency, and we can access it with a call to ref.read().
And this makes our settingsRepositoryProvider declaration a lot simpler:
final settingsRepositoryProvider = Provider<SettingsRepository>((ref) {
  return SettingsRepository(ref);
});
With Riverpod, we can declare providers that contain complex logic or depend on other providers, all outside the widget tree. This is a great advantage over the Provider package and makes it easier to write widgets that only contain UI code.
For a real-world example of how to combine providers and handle multiple dependencies in a complex app, read this:
Scoping Providers
With Riverpod, we can scope providers so that they behave differently for a specific part of the application.
An example of this is when we have a ListView that shows a list of products, and each item needs to know the correct product id or index:
class ProductList extends StatelessWidget {
  @override
  Widget build(BuildContext context) {
    return ListView.builder(
      itemBuilder: (_, index) => ProductItem(index: index),
    );
  }
}
In the code above, we pass the builder's index as a constructor argument to the ProductItem widget:
class ProductItem extends StatelessWidget {
  const ProductItem({super.key, required this.index});
  final int index;

  @override
  Widget build(BuildContext context) {
    // do something with the index
  }
}
This works, but if the ListView rebuilds, all of its children will rebuild too.
As an alternative, we can override the provider value inside a nested ProviderScope:
// 1. Declare a Provider
final currentProductIndex = Provider<int>((_) => throw UnimplementedError());

class ProductList extends StatelessWidget {
  @override
  Widget build(BuildContext context) {
    return ListView.builder(itemBuilder: (context, index) {
      // 2. Add a parent ProviderScope
      return ProviderScope(
        overrides: [
          // 3. Add a dependency override on the index
          currentProductIndex.overrideWithValue(index),
        ],
        // 4. return a **const** ProductItem with no constructor arguments
        child: const ProductItem(),
      );
    });
  }
}

class ProductItem extends ConsumerWidget {
  const ProductItem({super.key});

  @override
  Widget build(BuildContext context, WidgetRef ref) {
    // 5. Access the index via WidgetRef
    final index = ref.watch(currentProductIndex);
    // do something with the index
  }
}
In this case:
- We create a
Providerthat throwsUnimplementedErrorby default. - We override its value by adding a parent
ProviderScopeto theProductItemwidget. - We watch the index inside the
ProductItem'sbuildmethod.
This is better for performance because we can create ProductItem as a const widget in the ListView.builder. So even if the ListView rebuilds, our ProductItem will not rebuild unless its index has changed.
Filtering widget rebuilds with "select"
Sometimes you have a model class with multiple properties, and you want to rebuild a widget only when a specific property changes.
For example, consider this Connection class, along with a provider and a widget class that reads it:
class Connection {
  Connection({this.bytesSent = 0, this.bytesReceived = 0});
  final int bytesSent;
  final int bytesReceived;
}

// Using [StateProvider] for simplicity.
// This would be a [FutureProvider] or [StreamProvider] in real-world usage.
final connectionProvider = StateProvider<Connection>((ref) {
  return Connection();
});

class BytesReceivedText extends ConsumerWidget {
  @override
  Widget build(BuildContext context, WidgetRef ref) {
    // rebuild when bytesSent OR bytesReceived changes
    final counter = ref.watch(connectionProvider).state;
    return Text('${counter.bytesReceived}');
  }
}
If we call ref.watch(connectionProvider), our widget will (incorrectly) rebuild when the bytesSent value changes.
Instead, we can use select() to only listen to a specific property:
class BytesReceivedText extends ConsumerWidget {
  @override
  Widget build(BuildContext context, WidgetRef ref) {
    // only rebuild when bytesReceived changes
    final bytesReceived = ref.watch(connectionProvider.select(
      (connection) => connection.state.bytesReceived
    ));
    return Text('$bytesReceived');
  }
}
Then, whenever the Connection changes, Riverpod will compare the value we're returning (connection.state.bytesReceived) and only rebuild the widget if it's different from the previous one.
The
selectmethod is available on all Riverpod providers and can be used whenever we callref.watch()orref.listen(). For more info, read Using "select" to filter rebuilds in the Riverpod docs.
Testing with Riverpod
As we've seen, Riverpod providers are global but their state isn't.
The state of a provider is stored inside a ProviderContainer, an object that is implicitly created by ProviderScope.
This means that separate widget tests will never share any state, so there is no need for setUp and tearDown methods.
For example, here is a simple counter application that uses a StateProvider to store the counter value:
final counterProvider = StateProvider((ref) => 0);

void main() {
  runApp(ProviderScope(child: MyApp()));
}

class MyApp extends StatelessWidget {
  @override
  Widget build(BuildContext context) {
    return MaterialApp(
      home: Consumer(builder: (_, ref, __) {
        final counter = ref.watch(counterProvider);
        return ElevatedButton(
          onPressed: () => ref.read(counterProvider.notifier).state++,
          child: Text('${counter.state}'),
        );
      }),
    );
  }
}
The code above uses an ElevatedButton to show the counter value and increment it via the onPressed callback.
When writing widget tests, all we need is this:
await tester.pumpWidget(ProviderScope(child: MyApp()));
With this setup, multiple tests don't share any state because each test has a different ProviderScope:
void main() {
  testWidgets('incrementing the state updates the UI', (tester) async {
    await tester.pumpWidget(ProviderScope(child: MyApp()));

    // The default value is `0`, as declared in our provider
    expect(find.text('0'), findsOneWidget);
    expect(find.text('1'), findsNothing);

    // Increment the state and re-render
    await tester.tap(find.byType(ElevatedButton));
    await tester.pump();

    // The state have properly incremented
    expect(find.text('1'), findsOneWidget);
    expect(find.text('0'), findsNothing);
  });

  testWidgets('the counter state is not shared between tests', (tester) async {
    await tester.pumpWidget(ProviderScope(child: MyApp()));

    // The state is `0` once again, with no tearDown/setUp needed
    expect(find.text('0'), findsOneWidget);
    expect(find.text('1'), findsNothing);
  });
}
How to mock and override dependencies in tests
Many applications need to call REST APIs or communicate with external services.
For example, here is a MoviesRepository that we can use to get a list of favourite movies:
class MoviesRepository {
  Future<List<Movie>> favouriteMovies() async {
    // get data from the network or local database
  }
}
And we can create a moviesProvider to get the data we need:
final moviesRepositoryProvider = Provider((ref) => MoviesRepository());

final moviesProvider = FutureProvider<List<Movie>>((ref) {
  // access the provider above
  final repository = ref.watch(moviesRepositoryProvider);
  // use it to return a Future
  return repository.favouriteMovies();
});
When writing widget tests, we want to replace our MoviesRepository with a mock that returns a canned response rather than making a network call.
As we have seen, we can use dependency overrides to change the behaviour of a provider by replacing it with a different implementation.
So we can implement a MockMoviesRepository:
class MockMoviesRepository implements MoviesRepository {
  @override
  Future<List<Movie>> favouriteMovies() {
    return Future.value([
      Movie(id: 1, title: 'Rick & Morty', posterUrl: 'https://nnbd.me/1.png'),
      Movie(id: 2, title: 'Seinfeld', posterUrl: 'https://nnbd.me/2.png'),
    ]);
  }
}
And in our widget tests, we can override the repository provider:
void main() {
  testWidgets('Override moviesRepositoryProvider', (tester) async {
    await tester.pumpWidget(
      ProviderScope(
        overrides: [
          moviesRepositoryProvider
              .overrideWithValue(MockMoviesRepository())
        ],
        child: MoviesApp(),
      ),
    );
  });
}
As a result, the MoviesApp widget will load the data from the MockMoviesRepository when the tests run.
This setup also works if you use mocktail in your tests. You can stub your mock methods to return values or throw exceptions and verify that they are called.
Where to learn more about Testing with Riverpod?
The examples above are quite basic. If you're serious about testing, you'll need some more resources. 👇
The official Riverpod testing guide covers some more details (including how to write unit tests using ProviderContainer), but it is not very extensive.
If you have some custom notifiers with dependencies and want to unit-test them, read this:
And for a more comprehensive guide about testing with Riverpod (and Flutter in general), you can take my latest course, which contains over three hours of content about testing alone:
Logging with ProviderObserver
Monitoring state changes is beneficial in many apps.
And Riverpod includes a ProviderObserver class that we can subclass to implement a Logger:
class Logger extends ProviderObserver {
  @override
  void didUpdateProvider(
    ProviderBase provider,
    Object? previousValue,
    Object? newValue,
    ProviderContainer container,
  ) {
    print('[${provider.name ?? provider.runtimeType}] value: $newValue');
  }
}
This gives us access to both the previous and new value.
We can enable logging for the entire app by adding the Logger to the list of observers inside the ProviderScope:
void main() {
  runApp(
    ProviderScope(observers: [Logger()], child: MyApp()),
  );
}
To improve the output of the logger, we can add a name to our providers:
final counterStateProvider = StateProvider<int>((ref) {
  return 0;
}, name: 'counter');
And if needed, we can tweak the output of the logger based on the observed values:
class Logger extends ProviderObserver {
  @override
  void didUpdateProvider(
    ProviderBase provider,
    Object? previousValue,
    Object? newValue,
    ProviderContainer container,
  ) {
    if (newValue is StateController<int>) {
      print(
          '[${provider.name ?? provider.runtimeType}] value: ${newValue.state}');
    }
  }
}
ProviderObserver is versatile, and we can configure our logger to only log values that match a specific type or provider name. Or we can use a nested ProviderScope and only log values inside a particular widget subtree.
This way, we can evaluate state changes and monitor widget rebuilds without putting print statements all over the place.
ProviderObserveris similar to theBlocObserverwidget from theflutter_blocpackage.
Quick Note about App Architecture with Riverpod
When building complex apps, it's crucial to choose a good app architecture that can support your codebase as it grows.
As I said earlier:
- Keeping application state and logic inside our widgets leads to poor separation of concerns.
- Moving it inside our providers makes our code more testable and maintainable.
As it turns out, Riverpod is very well suited to solve architecture problems, without getting in the way.
But what does a robust Riverpod app architecture look like?
After a lot of research, I formalized an architecture that is composed of four layers (data, domain, application, presentation):

I use this architecture extensively in my own apps, and have written an entire series of articles about it.
To learn more, you can get started here: 👇
Conclusion
Riverpod borrows the best features of Provider and adds many benefits that make it easier and safer to manage state in our apps.
In addition to everything we have covered in this guide, I recommend checking the official documentation along with the official example apps:
If you want to build medium-to-large sized apps, I think you'll enjoy my entire series about app architecture with Riverpod:
And if you want to go even more in-depth, check out my latest Flutter course where you'll learn how to build a complete eCommerce app with Riverpod 2.0. 👇
Flutter Foundations Course Now Available
I launched a brand new course that covers state management with Riverpod in great depth, along with other important topics like app architecture, routing, testing, and much more:


