Update: Riverpod 3.0 was released in September 2025. To learn what's changed, read: What's new in Riverpod 3.0.
Writing Flutter apps using Riverpod got a lot easier with the introduction of the riverpod_generator package.
Using the new Riverpod syntax, we use the @riverpod annotation and let build_runner generate all the providers on the fly.
I have already covered all the basics in this article:
And in this article, we'll take things further and learn about the Notifier and AsyncNotifier classes that were added to Riverpod 2.0.
March 2023 update: we'll also cover the new
StreamNotifierclass that was added to Riverpod 2.3.
These classes are meant to replace StateNotifier and bring some new benefits:
- easier to perform complex, asynchronous initialization
- more ergonomic API: no longer need to pass
refaround - no longer need to declare the providers manually (if we use Riverpod Generator)
By the end, you'll know how to create custom state classes with minimal effort, and quickly generate complex providers using riverpod_generator.
Ready? Let's go! 🔥
This article assumes that you're already familiar with Riverpod. If you're new to Riverpod, read: Flutter Riverpod 2.0: The Ultimate Guide
What we will cover
To make this tutorial easier to follow, we'll use two examples.
1. Simple Counter
The first example will be a simple counter based on StateProvider.
We'll convert it to the new Notifier and learn about its syntax.
After that, we'll add Riverpod Generator to the mix and see how to generate the corresponding NotifierProvider automatically.
2. Auth Controller
Then, we'll study a more complex example with some asynchronous logic based on StateNotifier.
We'll convert it to use the new AsyncNotifier class and learn some nuances around asynchronous initialization.
And we'll also convert that to use Riverpod Generator and generate the corresponding AsyncNotifierProvider.
Finally, we'll summarize the benefits of Notifier and AsyncNotifier, so you can choose if you want to use them in your apps.
And I'll also share some source code showing how everything fits together.
Let's dive in! 👇
A Simple Counter with StateProvider
As a first step, let's consider a simple StateProvider, along with a CounterWidget that uses it:
// 1. declare a [StateProvider]
final counterProvider = StateProvider<int>((ref) {
  return 0;
});

// 2. create a [ConsumerWidget] subclass
class CounterWidget extends ConsumerWidget {
  @override
  Widget build(BuildContext context, WidgetRef ref) {
    // 3. watch the provider and rebuild when the value changes
    final counter = ref.watch(counterProvider);
    return ElevatedButton(
      // 4. use the value
      child: Text('Value: $counter'),
      // 5. change the state inside a button callback
      onPressed: () => ref.read(counterProvider.notifier).state++,
    );
  }
}
Nothing fancy here:
- we can watch the counter value in the
buildmethod - we can increment it in the button callback
As we can see, StateProvider is easy to declare:
final counterProvider = StateProvider<int>((ref) {
  return 0;
});
This is ideal for storing and updating simple variables like the counter above.
But StateProvider doesn't work well if your state needs some validation logic, or you need to represent more complex objects.
And while StateNotifier is a suitable alternative for more advanced cases, using the new Notifier class is now recommended. 👇
How does Notifier work?
Here's how we can declare a Counter class that is based on the Notifier class.
// counter.dart
import 'package:flutter_riverpod/flutter_riverpod.dart';

class Counter extends Notifier<int> {
  @override
  int build() {
    return 0;
  }

  void increment() {
    state++;
  }
}
Two things to note:
- we have a
buildmethod that returns anint(the initial value) - we can (optionally) add a method to increment the state (our counter value)
If we want to create a provider for this class, we can do this:
final counterProvider = NotifierProvider<Counter, int>(() {
  return Counter();
});
Alternatively, we can use Counter.new as a constructor tear-off:
final counterProvider = NotifierProvider<Counter, int>(Counter.new);
Using the NotifierProvider in the Widget
As it turns out, we can use the counterProvider in our CounterWidget without any changes, as long as we import the counter.dart file:
import 'counter.dart';

class CounterWidget extends ConsumerWidget {
  @override
  Widget build(BuildContext context, WidgetRef ref) {
    // 1. watch the provider and rebuild when the value changes
    final counter = ref.watch(counterProvider);
    return ElevatedButton(
      // 2. use the value
      child: Text('Value: $counter'),
      // 3. change the state inside a button callback
      onPressed: () => ref.read(counterProvider.notifier).state++,
    );
  }
}
And since we also have an increment method, we can do this if we wish:
onPressed: () => ref.read(counterProvider.notifier).increment(),
The increment method makes our code more expressive. But it's optional, as we can still modify the state directly if we want.
StateProvider vs NotifierProvider
So far, we've learned that StateProvider works well when we need to modify simple variables.
But if our state (and the logic for updating it) is more complex, Notifier and NotifierProvider are a good alternative that is still easy to implement:
// counter.dart
import 'package:flutter_riverpod/flutter_riverpod.dart';

class Counter extends Notifier<int> {
  @override
  int build() {
    return 0;
  }

  void increment() {
    state++;
  }
}

final counterProvider = NotifierProvider<Counter, int>(Counter.new);
And if we want, we can automate the generation of the provider. 👇
Notifier with Riverpod Generator
Here's how we can declare the same Counter class using the new @riverpod syntax:
import 'package:riverpod_annotation/riverpod_annotation.dart';

part 'counter.g.dart';

@riverpod
class Counter extends _$Counter {
  @override
  int build() {
    return 0;
  }

  void increment() {
    state++;
  }
}
Note how in this case, we extend _$Counter rather than Notifier<int>.
And if we run dart run build_runner watch -d, the counter.g.dart file will be generated for us, with this code inside it:
/// See also [Counter].
final counterProvider = AutoDisposeNotifierProvider<Counter, int>(
  Counter.new,
  name: r'counterProvider',
  debugGetCreateSourceHash:
      const bool.fromEnvironment('dart.vm.product') ? null : $CounterHash,
);
typedef CounterRef = AutoDisposeNotifierProviderRef<int>;

abstract class _$Counter extends AutoDisposeNotifier<int> {
  @override
  int build();
}
The two main things to notice are:
- a
counterProviderwas created for us _$CounterextendsAutoDisposeNotifier<int>
AutoDisposeNotifier is defined like this inside the Riverpod package:
/// {@template riverpod.notifier}
abstract class AutoDisposeNotifier<State>
    extends BuildlessAutoDisposeNotifier<State> {
  /// {@macro riverpod.asyncnotifier.build}
  @visibleForOverriding
  State build();
}
As we can see, the build method returns a generic State type.
But how is this related to our Counter class, and how does Riverpod Generator know which type to use?
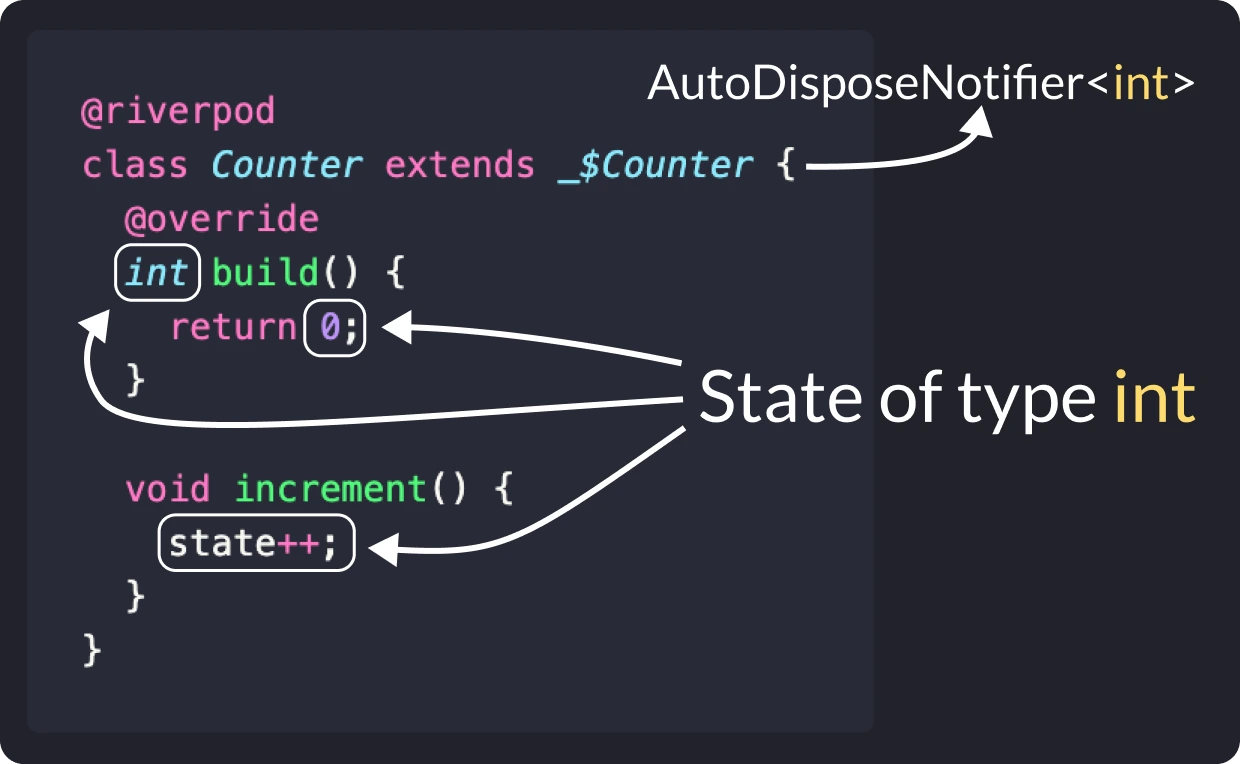
The answer is that _$Counter extends AutoDisposeNotifier<int>, and the state property is also an int because we've defined the build method to return an int.
Once we have decided which type to use, we need to use it consistently if we want to avoid compile-time errors.
And inside our widget class, all the code will continue to work as long as we import the generated counter.g.dart file:
import 'counter.g.dart';

class CounterWidget extends ConsumerWidget {
  @override
  Widget build(BuildContext context, WidgetRef ref) {
    // 1. watch the provider and rebuild when the value changes
    final counter = ref.watch(counterProvider);
    return ElevatedButton(
      // 2. use the value
      child: Text('Value: $counter'),
      // 3. change the state inside a button callback
      onPressed: () => ref.read(counterProvider.notifier).state++,
    );
  }
}
StateProvider or Notifier?
We've covered some important concepts already, so let's do a brief summary before moving on.
StateProvider is still the easiest way to store simple state:
final counterProvider = StateProvider<int>((ref) {
  return 0;
});
But we can also accomplish the same with a Notifier subclass and a NotifierProvider:
// counter.dart
import 'package:flutter_riverpod/flutter_riverpod.dart';

class Counter extends Notifier<int> {
  @override
  int build() {
    return 0;
  }

  void increment() {
    state++;
  }
}

final counterProvider = NotifierProvider<Counter, int>(Counter.new);
This is more verbose but also more flexible, as we can add methods with complex logic to our Notifier subclasses (much like what we do with StateNotifier).
And if we want, we can use the new @riverpod syntax and automatically generate the counterProvider:
import 'package:riverpod_annotation/riverpod_annotation.dart';

part 'counter.g.dart';

@riverpod
class Counter extends _$Counter {
  @override
  int build() {
    return 0;
  }

  void increment() {
    state++;
  }
}

// counterProvider will be generated by build_runner
The Counter class we created is a simple example of how to store some synchronous state.
And as we're about to see, we can create asynchronous state classes using AsyncNotifier and replace StateNotifier and StateNotifierProvider entirely. 👇
A more complex example with StateNotifier
If you've been using Riverpod for some time, you'll be used to writing StateNotifier subclasses to store some immutable state that your widgets can listen to.
For example, we may want to sign in the user using a custom button class:

And to implement the sign-in logic, we could create the following StateNotifier subclass:
class AuthController extends StateNotifier<AsyncValue<void>> {
  AuthController(this.ref)
      // set the initial state (synchronously)
      : super(const AsyncData(null));
  final Ref ref;

  Future<void> signInAnonymously() async {
    // read the repository using ref
    final authRepository = ref.read(authRepositoryProvider);
    // set the loading state
    state = const AsyncLoading();
    // sign in and update the state (data or error)
    state = await AsyncValue.guard(authRepository.signInAnonymously);
  }
}
We can use this to sign in by calling the signInAnonymously method of the AuthRepository.
When we do asynchronous work inside a notifier, we can set the state more than once. This way, the widget can rebuild and show the correct UI for every possible state (data, loading, and error).
If you're not familiar with the repository pattern, read this: Flutter App Architecture: The Repository Pattern
If you're not familiar with the
AsyncValue.guardsyntax, read this: Use AsyncValue.guard rather than try/catch inside your AsyncNotifier subclasses
We also need to create the corresponding StateNotifierProvider, so that we can call watch, read or listen to it inside our widget:
final authControllerProvider = StateNotifierProvider<
    AuthController, AsyncValue<void>>((ref) {
  return AuthController(ref);
});
This provider can be used to get the controller and call signInAnonymously() inside a button callback:
onPressed: () => ref.read(authControllerProvider.notifier).signInAnonymously(),
While there's nothing wrong with this approach, StateNotifier can't be asynchronously initialized.
And the syntax for declaring a StateNotifierProvider is a bit clunky since it needs two type annotations.
But hang on! In the previous article we've learned that Riverpod Generator can generate the provider for us! 💡
So can we use it to do something like this?
@riverpod
class AuthController extends StateNotifier<AsyncValue<void>> {
  ...
}
If we try this and run dart run build_runner watch -d, we get this error:
Provider classes must contain a method named `build`.
As it turns out, we can't use the @riverpod syntax with StateNotifier.
And we should use the new AsyncNotifier class instead. 👇
How does AsyncNotifier work?
The Riverpod docs define AsyncNotifier as a Notifier implementation that is asynchronously initialized.
And here's how we can use it to convert our AuthController class:
// 1. add the necessary imports
import 'dart:async';
import 'package:flutter_riverpod/flutter_riverpod.dart';

// 2. extend [AsyncNotifier]
class AuthController extends AsyncNotifier<void> {
  // 3. override the [build] method to return a [FutureOr]
  @override
  FutureOr<void> build() {
    // 4. return a value (or do nothing if the return type is void)
  }

  Future<void> signInAnonymously() async {
    // 5. read the repository using ref
    final authRepository = ref.read(authRepositoryProvider);
    // 6. set the loading state
    state = const AsyncLoading();
    // 7. sign in and update the state (data or error)
    state = await AsyncValue.guard(authRepository.signInAnonymously);
  }
}
A few observations:
- The base class is
AsyncNotifier<void>rather thanStateNotifier<AsyncValue<void>>. - We need to override the
buildmethod and return the initial value (or nothing if the return type isvoid). - In the
signInAnonymouslymethod, we read another provider with therefobject, even though we haven't explicitly declaredrefas a property (more on this below).
Also note the usage of FutureOr: a type representing values that are either Future<T> or T. This is useful in our example because the underlying type is void, and we have nothing to return.
One advantage of
AsyncNotifieroverStateNotifieris that it allows us to initialize the state asynchronously. See the example below for more details.
Declaring the AsyncNotifierProvider
Before we can use the updated AuthController, we need to declare the corresponding AsyncNotifierProvider:
final authControllerProvider = AsyncNotifierProvider<AuthController, void>(() {
  return AuthController();
});
Or, using a constructor tear-off:
final authControllerProvider =
    AsyncNotifierProvider<AuthController, void>(AuthController.new);
Note how the function that creates the provider doesn't have a ref argument.
However, ref is always accessible as a property inside Notifier or AsyncNotifier subclasses, making it easy to read other providers.
This is unlike StateNotifier, where we need to pass ref explicitly as a constructor argument if we want to use it.
Note about autoDispose
Note that if you declare an AsyncNotifier and the corresponding AsyncNotifierProvider using autoDispose like this:
class AuthController extends AsyncNotifier<void> {
  ...
}
// note: this will produce a runtime error
final authControllerProvider =
    AsyncNotifierProvider.autoDispose<AuthController, void>(AuthController.new);
Then you'll get a runtime error:
Error: Type argument 'AuthController' doesn't conform to the bound 'AutoDisposeAsyncNotifier<T>' of the type variable 'NotifierT' on 'AutoDisposeAsyncNotifierProviderBuilder.call'.
The correct way of using AsyncNotifier with autoDispose is to extend the AutoDisposeAsyncNotifier class:
// using AutoDisposeAsyncNotifier
class AuthController extends AutoDisposeAsyncNotifier<int> {
  ...
}

// using AsyncNotifierProvider.autoDispose
final authControllerProvider =
    AsyncNotifierProvider.autoDispose<AuthController, void>(AuthController.new);
The
.autoDisposemodifier can be used to reset the provider's state when all the listeners are removed. For more info, read: The autoDispose modifier
The good news is that we don't have to worry about the correct syntax at all if we use the Riverpod Generator. 👇
AsyncNotifier with Riverpod Generator
Just like we've used the new @riverpod syntax with Notifier, we can do the same with AsyncNotifier.
Here's how we can convert the AuthController to use it:
// 1. import this
import 'package:riverpod_annotation/riverpod_annotation.dart';

// 2. declare a part file
part 'auth_controller.g.dart';

// 3. annotate
@riverpod
// 4. extend like this
class AuthController extends _$AuthController {
  // 5. override the [build] method to return a [FutureOr]
  @override
  FutureOr<void> build() {
    // 6. return a value (or do nothing if the return type is void)
  }

  Future<void> signInAnonymously() async {
    // 7. read the repository using ref
    final authRepository = ref.read(authRepositoryProvider);
    // 8. set the loading state
    state = const AsyncLoading();
    // 9. sign in and update the state (data or error)
    state = await AsyncValue.guard(authRepository.signInAnonymously);
  }
}
As a result, the base class is _$AuthController and is auto-generated.
And if we look at the generated code, we find this:
/// See also [AuthController].
final authControllerProvider =
    AutoDisposeAsyncNotifierProvider<AuthController, void>(
  AuthController.new,
  name: r'authControllerProvider',
  debugGetCreateSourceHash: const bool.fromEnvironment('dart.vm.product')
      ? null
      : $AuthControllerHash,
);
typedef AuthControllerRef = AutoDisposeAsyncNotifierProviderRef<void>;

abstract class _$AuthController extends AutoDisposeAsyncNotifier<void> {
  @override
  FutureOr<void> build();
}
The two main things to notice are:
- an
authControllerProviderwas created for us _$AuthControllerextendsAutoDisposeAsyncNotifier<void>.
In turn, this class is defined like this inside the Riverpod package:
/// {@macro riverpod.asyncnotifier}
abstract class AutoDisposeAsyncNotifier<State>
    extends BuildlessAutoDisposeAsyncNotifier<State> {
  /// {@macro riverpod.asyncnotifier.build}
  @visibleForOverriding
  FutureOr<State> build();
}
This time, the build method returns a FutureOr<State>.
Here's our AuthController class once again:
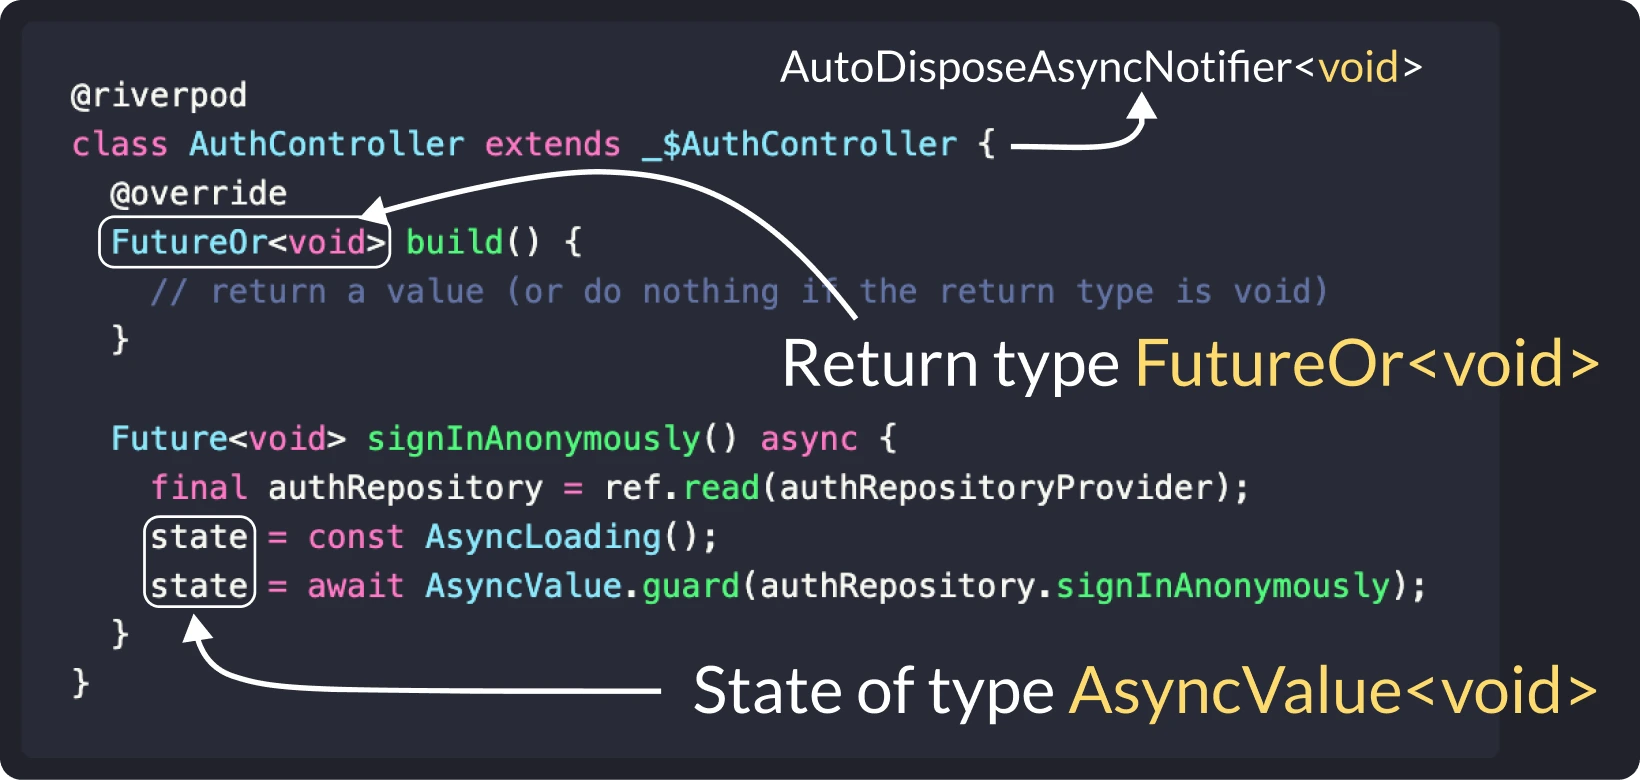
As we can see from the diagram above, we're dealing with void, FutureOr<void> and AsyncValue<void>.
But how are these types related?
Well, the type of the state property is AsyncValue<void> because the return type of the build method is FutureOr<void>.
And this means we can set the state to AsyncData, AsyncLoading, or AsyncError in the signInAnonymously method.
StateNotifier or AsyncNotifier?
For comparison, here's the previous implementation based on StateNotifier:
class AuthController extends StateNotifier<AsyncValue<void>> {
  AuthController(this.ref) : super(const AsyncData(null));
  final Ref ref;

  Future<void> signInAnonymously() async {
    final authRepository = ref.read(authRepositoryProvider);
    state = const AsyncLoading();
    state = await AsyncValue.guard(authRepository.signInAnonymously);
  }
}

final authControllerProvider =
    StateNotifierProvider<AuthController, AsyncValue<void>>((ref) {
  return AuthController(ref);
});
And here's the new one:
@riverpod
class AuthController extends _$AuthController {
  @override
  FutureOr<void> build() {
    // return a value (or do nothing if the return type is void)
  }

  Future<void> signInAnonymously() async {
    final authRepository = ref.read(authRepositoryProvider);
    state = const AsyncLoading();
    state = await AsyncValue.guard(authRepository.signInAnonymously);
  }
}
With the @riverpod syntax, there's less code to write since we no longer need to declare the provider manually.
And since ref is available as a property to all Notifier subclasses, we don't need to pass it around.
And the code in our widgets remains the same since we can watch, read, or listen to the authControllerProvider as we did before.
Example with Asynchronous Initialization
Since AsyncNotifier supports asynchronous initialization, we can write code like this:
@riverpod
class SomeOtherController extends _$SomeOtherController {
  @override
  // note the [Future] return type and the async keyword
  Future<String> build() async {
    final someString = await someFutureThatReturnsAString();
    return anotherFutureThatReturnsAString(someString);
  }

  // other methods here
}
In this case, the build method is truly asynchronous and will only return when the future completes.
But the build method of any listener widgets needs to return synchronously and can't wait for the future to complete:
class SomeWidget extends ConsumerWidget {
  @override
  Widget build(BuildContext context, WidgetRef ref) {
    // returns AsyncLoading on first load,
    // rebuilds with the new value when the initialization is complete
    final valueAsync = ref.watch(someOtherControllerProvider);
    return valueAsync.when(...);
  }
}
To handle this, the controller will emit two states, and the widget will rebuild twice:
- once with a temporary
AsyncLoadingvalue on first load - again with the new
AsyncDatavalue (or anAsyncError) when the initialization is complete
On the other hand, if we use a synchronous Notifier or an AsyncNotifier with a build method that returns FutureOr and is not marked as async, the initial state will be immediately available, and the widget will only build once when first loaded.
Example: Passing Arguments to an AsyncNotifier
Sometimes, you may need to pass additional arguments to an AsyncNotifier.
This is done by declaring them as named or positional parameters in the build method:
@riverpod
class SomeOtherController extends _$SomeOtherController {
  @override
  // you can add named or positional parameters to the build method
  Future<String> build(int someValue) async {
    final someString = await someFutureThatReturnsAString(someValue);
    return anotherFutureThatReturnsAString(someString);
  }

  // other methods here
}
Then, you can simply pass them as arguments when you watch, read, or listen to the provider:
// this provider takes a positional argument of type int
final state = ref.watch(someOtherControllerProvider(42));
The syntax for declaring and passing arguments to an
AsyncNotifieror any other provider is the same. After all, they are just regular function arguments, and Riverpod Generator takes care of everything for us. For more details, read: Creating and reading an annotated FutureProvider from my previous article.
New in Riverpod 2.3: StreamNotifier
With the release of Riverpod Generator 2.0.0, it's now possible to generate a provider that returns a Stream:
@riverpod
Stream<int> values(ValuesRef ref) {
  return Stream.fromIterable([1, 2, 3]);
}
And if we use the Riverpod Lint package, we can convert the provider above to a "stateful" variant:

This is the result:
@riverpod
class Values extends _$Values {
  @override
  Stream<int> build() {
    return Stream.fromIterable([1, 2, 3]);
  }
}
And under the hood, build_runner will generate a StreamNotifier and the corresponding AutoDisposeStreamNotifierProvider.
AsyncNotifierandStreamNotifierare class variants of the old goodFutureProviderandStreamProvider. If you need to watch aFutureorStreambut also add methods to perform some data mutations, a class variant is the way to go.
Notifier and AsyncNotifier: are they worth it?
For a long time, StateNotifier has served us well, giving us a place to store complex state and the logic for modifying it outside the widget tree.
Notifier and AsyncNotifier are meant to replace StateNotifier and bring some new benefits:
- easier to perform complex, asynchronous initialization
- more ergonomic API: no longer need to pass
refaround - no longer need to declare the providers manually (if we use Riverpod Generator)
For new projects, these benefits are worth it since the new classes help you accomplish more with less code.
But if you have a lot of pre-existing code using StateNotifier, it's up to you to decide if (or when) you're going to migrate to the new syntax.
In any case, StateNotifier will be around for a while, and you can migrate your providers one at a time if you want.
How to test AsyncNotifier subclasses?
One thing we haven't covered here is now to write unit tests for Notifier and AsyncNotifier subclasses.
This is an interesting topic on its own, and I've covered it in detail in this article:
Conclusion
Since it was introduced, Riverpod has evolved from a simple state management solution to a reactive caching and data-binding framework.
Riverpod makes it easy to work with asynchronous data, thanks to classes like FutureProvider, StreamProvider, and AsyncValue.
Likewise, the new Notifier, AsyncNotifier, and StreamNotifier classes make it easy to create custom state classes using an ergonomic API.
Figuring out the correct syntax for all combinations of providers and modifiers (autoDispose and family) was one major pain point with Riverpod.
But with the new riverpod_generator package, all these problems go away as you can leverage build_runner and generate all the providers on the fly.
And with the new riverpod_lint package, we get Riverpod-specific lint rules and code assists that help us get the syntax right.
With all my Riverpod articles, I wanted to give you a detailed overview of what Riverpod is capable of.
And if you want to go even more in-depth, check out my latest Flutter course, where you'll learn how to build a complete eCommerce app with Riverpod 2.0. 👇
Flutter Foundations Course Now Available
I launched a brand new course that covers state management with Riverpod in great depth, along with other important topics like app architecture, routing, testing, and much more:


