Update: Riverpod 3.0 was released in September 2025, introducing a new experimental mutations feature. To learn what's changed, read: What's new in Riverpod 3.0.
In my previous article, I’ve introduced a Riverpod app architecture made of four layers (data, domain, application, and presentation):

Each of these layers has its own responsibility, and there's a clear contract for how communication happens across boundaries.
But how do all these different classes interact with each other, and how can we use them to build and ship features in our apps?
This is where Riverpod and all its useful providers come in.
And when building mobile apps, much of the work we do boils down to two things:
- How to fetch data and show it in the UI?
- How to perform data mutations in response to input events?
So, in this article, I’m going to answer these questions and give you a clearer picture of how everything fits together.
Ready? Let’s go!
How to Fetch Data with the Riverpod Architecture
From a conceptual point of view, when our app reads some data from the network, the data “flows” from the data source all the way to the UI:

But if we’re only fetching data, do we really need to create separate services and controllers?
Of course not.
Instead, the simplest way to fetch data with Riverpod is to declare a FutureProvider (or StreamProvider if you have realtime data) and watch it inside the build method of our widget.
For this use case, a simplified version of our app architecture looks like this:

The whole process is made of four steps:
- The widget watches a
FutureProvider, which in turn calls a repository method that will retrieve the data - The repository fetches the data from the data source
- Once a response is received, it is parsed and returned from the repository (and the attached
FutureProvider, which also caches the data) - The widget receives the data as an
AsyncValue<Model>and maps it to the UI
But how can we implement this in code?
Data Fetching Example: Weather App
As a practical example, let’s see how to fetch some weather data from an API and show it in the UI.
The first step is to create a Weather model class:
// domain/weather.dart
class Weather {
  Weather(this.temp);
  final double temp;

  // just a basic implementation
  factory Weather.fromJson(Map<String, dynamic> json) {
    return Weather(json['temp'] as double);
  }
  // TODO: Implement ==, hashCode, toString()
}
Then, we can define a WeatherRepository and the corresponding providers:
// data/weather_repository.dart
import 'package:http/http.dart' as http;
import 'package:riverpod_annotation/riverpod_annotation.dart';
import 'package:riverpod_examples/weather.dart';

part 'weather_repository.g.dart';

class WeatherRepository {
  WeatherRepository(this.client);
  // this is the data source (from the http package)
  final http.Client client;

  Future<Weather> fetchWeather(String city) {
    // TODO: use the http client to:
    // 1. fetch the weather data
    // 2. parse the response and return a Weather object
  }
}

// this will generate a weatherRepositoryProvider
@riverpod
WeatherRepository weatherRepository(WeatherRepositoryRef ref) {
  return WeatherRepository(http.Client());
}

// this will generate a fetchWeatherProvider
@riverpod
Future<Weather> fetchWeather(FetchWeatherRef ref, String city) {
  return ref.watch(weatherRepositoryProvider).fetchWeather(city);
}
The code above uses the modern
@riverpodsyntax from the Riverpod Generator package (but this is not mandatory and we could have used regular providers instead). To learn more, read: How to Auto-Generate your Providers with Flutter Riverpod Generator.
What matters most is that we have two providers:
- a
weatherRepositoryProviderso we can access the repository - a
fetchWeatherProviderso we can fetch the weather (and cache it)
Finally, here’s the UI code:
// presentation/weather_ui.dart
import 'package:flutter/material.dart';
import 'package:flutter_riverpod/flutter_riverpod.dart';
import 'package:riverpod_examples/weather_repository.dart';

class WeatherUI extends ConsumerWidget {
  const WeatherUI({super.key});

  @override
  Widget build(BuildContext context, WidgetRef ref) {
    // note
    final weatherAsync = ref.watch(fetchWeatherProvider('London'));
    return weatherAsync.when(
      data: (weather) => Text(weather.temp.toString()),
      loading: () => const Center(child: CircularProgressIndicator()),
      error: (e, _) => Text(e.toString()),
    );
  }
}
Note that since we’re fetching data from an asynchronous provider, our widget will rebuild twice. The first time with a value of
AsyncLoading(when the widget is first mounted) and then again with a value ofAsyncData(weather)(once the data has been fetched).
This is a very simple data-fetching example. But even if we need to parse complex JSON or fetch an entire list of results, we need only four ingredients:
- a widget class to show the UI
- a model class to represent the data
- a repository to pull the data from the network
- some providers to glue everything together
Note that while fetching data, no controllers are required at all.
I know that people using Riverpod often get confused at this point, so I’ll say this again:
When you’re simply fetching data (no matter how complex), you don’t need an AsyncNotifier (or a StateNotifier or ChangeNotifier) at all!
All you need is a FutureProvider (for one-time reads) or a StreamProvider (if you have a realtime data source). And by using them, you get data caching for free!
To learn more about the data caching capabilities of Riverpod, read: Riverpod Data Caching and Providers Lifecycle: Full Guide.
Fetching Data: Essential Steps
In summary, when you need to fetch some data and show it in the UI, follow these steps:
- Create a model class and add a
fromMap/fromJsonfactory constructor (only store/parse the values you need to show in the UI). - Create a repository and add a method that fetches the data and returns a
Future(orStream). - Create a repository provider along with a
FutureProvider(orStreamProvider) that uses the method you just added. - In the widget, watch that provider and map your data to the UI.
Once again, here’s how this works at runtime:
Of course, fetching data is just one part of the story (and the easy one at that!).
But sometimes, you also need to write some data back to a database or remote backend, in response to input events.
The process of “writing data back” is known as a data mutation, so let’s learn how that works. 👇
How to Perform Data Mutations with the Riverpod Architecture
When a mutation takes place, the data propagates in this order: widget → controller → service (optional) → repository → data source:

And when it comes to data mutations, there are a few concerns we need to address:
- how can we write (create/update/delete) some data on the backend in response to an input event?
- how can we ensure our UI is in the right state (data/loading/error) before, during, and after the mutation?
- how do we propagate the data (or errors) back to the UI after the mutation has been completed?
All these concerns warrant the introduction of controller classes, which can be used to:
- receive the input data from the widgets
- call a repository method and pass the data along so it can be written to the backend
- update the state so the widget can handle data/loading/error scenarios
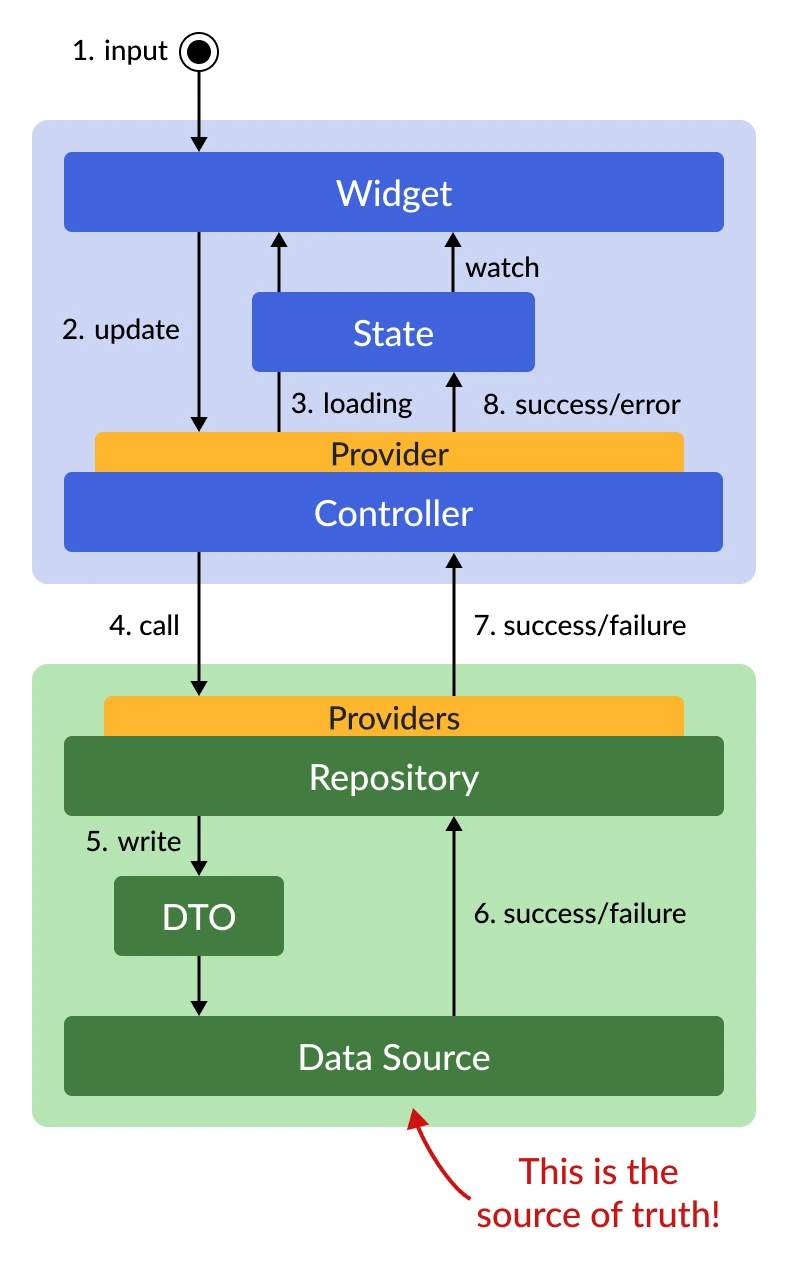
Here’s a more detailed diagram showing what happens when a mutation takes place:

The steps happen in this order:
- an input event takes place (such as the user submitting a form)
- the input data is passed to the controller that will handle it
- the controller sets the state to “loading” so the widget can update the UI
- the controller calls an async method, passing the data to be written to the repository
- the repository converts the data to a DTO and writes it (asynchronously) to the data source
- a response is received, or an exception is thrown
- the success or error status propagates back to the controller, which can handle it
- the controller sets the state to “success” or “error”, and the widget updates the UI
Note that by following the steps above, we take care of two concerns:
- perform the data mutation (by creating/updating/deleting data on the backend)
- update the UI (by setting the state to loading/success/error)
And of all the classes above, the controller plays a very important role. 👇
Handling Mutations with Controller Classes
Controllers can be implemented as AsyncNotifier subclasses. I’ve already covered controllers in detail in my article about the presentation layer, so I won’t be sharing a full example here.
But the main idea is that data mutations are asynchronous operations that can succeed or fail, and it’s best to keep the mutation logic outside the widgets.
For example, here’s how we may implement a controller that can be used to update a product:
@riverpod
class EditProductController extends _$EditProductController {
  @override
  FutureOr<void> build() {
    // perform some initialization if needed
    // then return the initial value
  }

  Future<void> updateProduct({
    required Product product, // the previous product
    required String title, // the new title
    required String description, // the new description
  }) async {
    final productsRepository = ref.read(productsRepositoryProvider);
    final updatedProduct = product.copyWith(
      title: title,
      description: description,
    );
    state = const AsyncLoading();
    // perform the mutation and update the state
    state = await AsyncValue.guard(
      () => productsRepository.updateProduct(updatedProduct),
    );
  }

  Future<void> deleteProduct(Product product) async {
    // similar to the method above, but use the repository
    // to delete the product instead
  }
}
And here’s how we may call the updateProduct method from our widget:
onPressed: () => ref
    .read(editProductControllerProvider.notifier)
    .updateProduct(
      product: product,
      title: _titleController.text,
      description: _descriptionController.text,
    ),
As we can see, the controller helps us separate the UI code from the logic for updating the data, and this makes our code more readable, testable, and maintainable.
Typically, a controller takes care of:
- managing the widget state (success/loading/error)
- taking any input arguments and massaging them into objects that can be passed to the repository (or service class)
- (optionally) navigating to a different screen if the mutation is successful (for more info on this, read: How to Navigate Without Context with GoRouter and Riverpod in Flutter)
However, note that the controller doesn’t perform the actual mutation (the repository does that by talking to the data source, which is the source of truth).
So, if you find yourself storing some application state (such as a theme setting or the user authentication state) inside a controller, you’re doing it wrong.
Instead, remember that the source of truth is in the data layer, and your controllers should only mediate between the widgets and the repositories.
Let’s recap what we have learned. 👇
Data Mutations: Essential Steps
If you need to implement data mutations in your app, follow these steps:
- Add the serialization logic in your model (
toMap/toJson) if you haven't done this before. - Add a repository method that performs the required mutation (create/update/delete).
- Create a controller as an
AsyncNotifiersubclass. Leave thebuildmethod empty and add a method that calls the repository method from step 2 and updates the state. - Inside a widget callback, use
ref.readto access the controller and call the method from step 3.
As an extra step, you can watch the controller’s state inside the widget’s
buildmethod and use it to disable the UI while the mutation is in progress. To learn more about this step, read: How to handle loading and error states with StateNotifier & AsyncValue in Flutter
The steps above take care of performing the data mutation.
However, one key concern is missing. 👇
How do we show the updated data in the UI once the mutation has completed?
The answer depends on whether the data source supports realtime updates or not.
Dealing with realtime listeners vs. one-time reads will be the topic of a separate article. But for now, I’ll say this:
Whenever possible, use a backend that supports realtime updates, since this makes it easy to rebuild the UI automatically when the data changes. 👍
To account for this, here’s an updated diagram showing that whenever a mutation takes place, the UI automatically updates as well:

And the easiest way to get this working is to:
- Add a repository method that returns a
Streamthat will emit a new value every time the data changes - Create the corresponding
StreamProvider - Watch the
StreamProviderin your widget so that the UI will rebuild when the data changes
As an aside, this means that it’s possible for a widget to watch both a StreamProvider (to get the data) and an AsyncNotifierProvider (to get state updates from the controller while a mutation is in progress), and in fact, I do this regularly in my own apps.
With that said, it’s time for a wrap-up. 🙂
Conclusion
When building mobile apps, we need to take care of two important concerns: fetching data and performing data mutations.
And if we use Riverpod, following this simple rule will make our life easier:
- When fetching data, use a
FutureProviderorStreamProvider - When mutating data, use an
AsyncNotifier
Since Riverpod is not very opinionated, we can follow a reference architecture where each layer has its own responsibility.
By following this architecture, fetching data becomes quite straightforward:
And while data mutations require a bit more work, they can be implemented in a repeatable way as well (especially if we have support for realtime updates):
The diagrams above and the steps I shared should be enough to get you started.
Though as you dig deeper, chances are that you'll have some additional questions:
- How to structure your project when you have many complex features?
- What if you need to combine data from different repositories?
- If the data source throws an exception, who’s responsible for catching it? The repository or the controller?
- What UI should we use to represent loading and error states?
- What should happen if the user submits some data and leaves the page before the mutation has completed?
Some of these implementation details can be decided once and for all for the entire project, while other decisions can be made on a case-by-case basis.
If you need more guidance or want to learn about the tradeoffs and techniques I use when building real-world apps, you can check out my Flutter Foundations course. 👇
Flutter Foundations Course Now Available
I launched a brand new course that covers Flutter app architecture in great depth, along with other important topics like state management, navigation & routing, testing, and much more:


