When writing Flutter apps, separating any business logic from the UI code is very important.
This makes our code more testable and easier to reason about, and is especially important as our apps become more complex.
To accomplish this, we can use design patterns to introduce a separation of concerns between different components in our app.
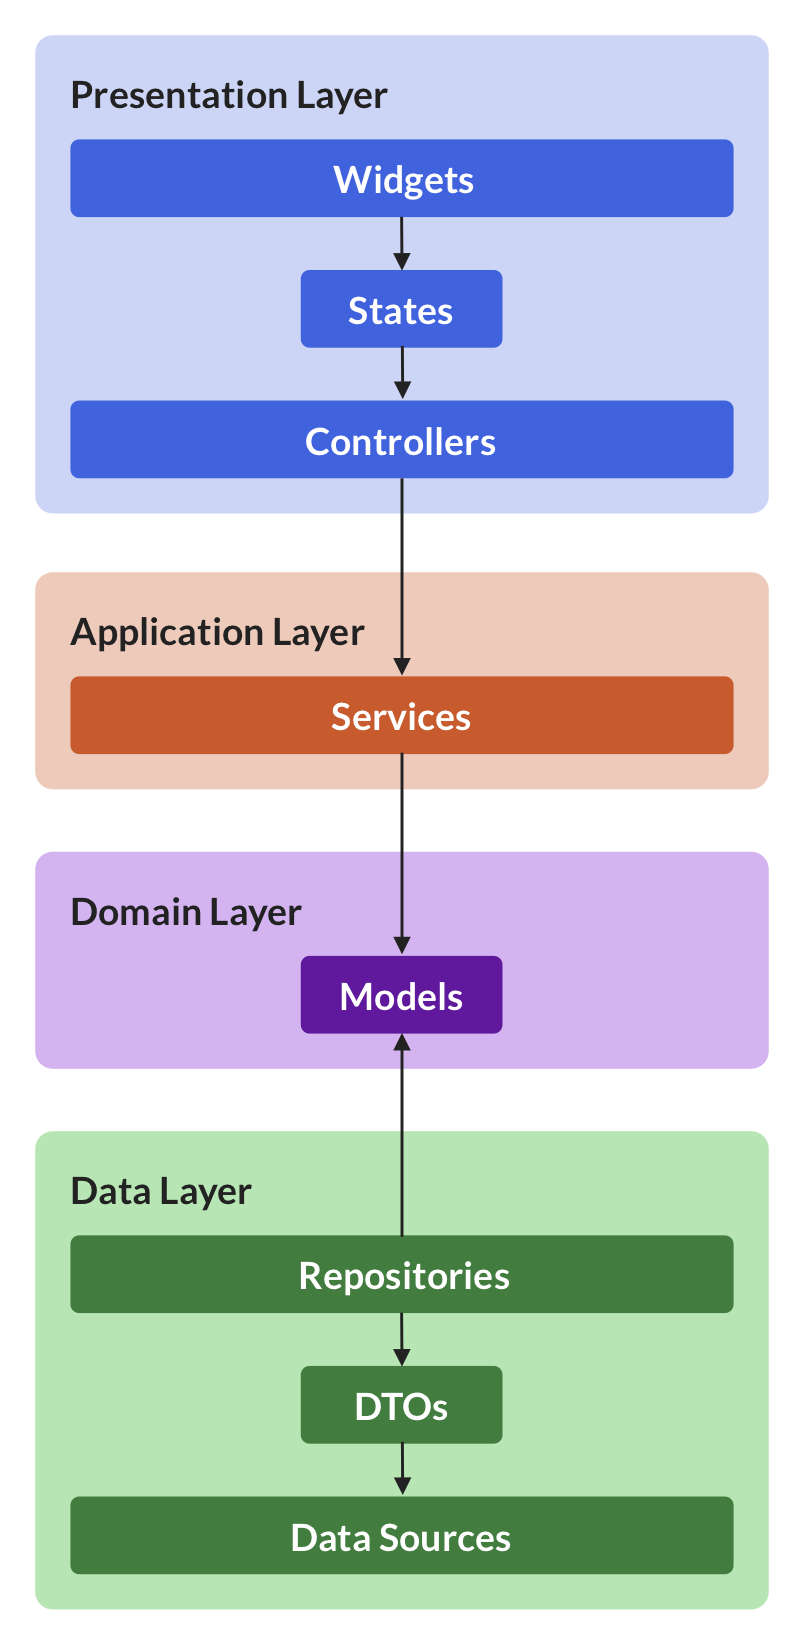
And for reference, we can adopt a layered app architecture such as the one represented in this diagram:

I have already covered some of the layers above in other articles:
- Flutter App Architecture with Riverpod: An Introduction
- Flutter App Architecture: The Repository Pattern
- Flutter App Architecture: The Domain Model
- Flutter App Architecture: The Application Layer
And this time, we will focus on the presentation layer and learn how we can use controllers to:
- hold business logic
- manage the widget state
- interact with repositories in the data layer
This kind of controller is the same as the view model that you would use in the MVVM pattern. If you've worked with flutter_bloc before, it has the same role as a cubit.
We will learn about the AsyncNotifier class, which is a replacement for the StateNotifier and the ValueNotifier / ChangeNotifier classes in the Flutter SDK.
And to make this more useful, we will implement a simple authentication flow as an example.
Ready? Let's go!
A simple authentication flow
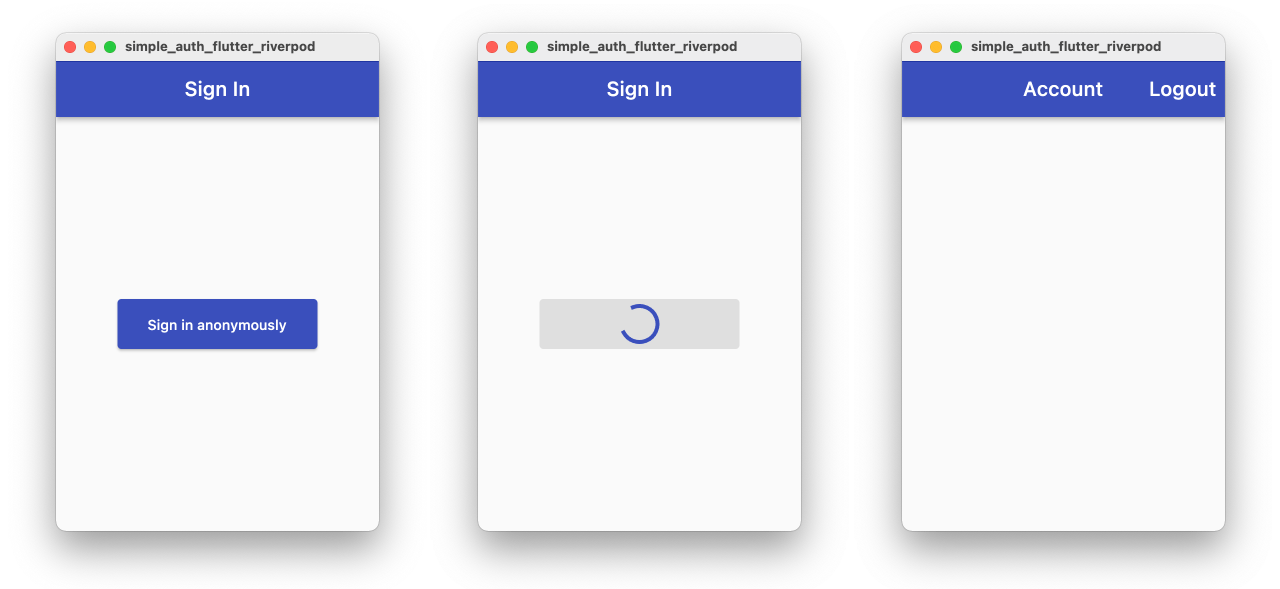
Let's consider a very simple app that we can use to sign in anonymously and toggle between two screens:

And in this article, we'll focus on how to implement:
- an auth repository that we can use to sign in and sign out
- a sign-in widget screen that we show to the user
- the corresponding controller class that mediates between the two
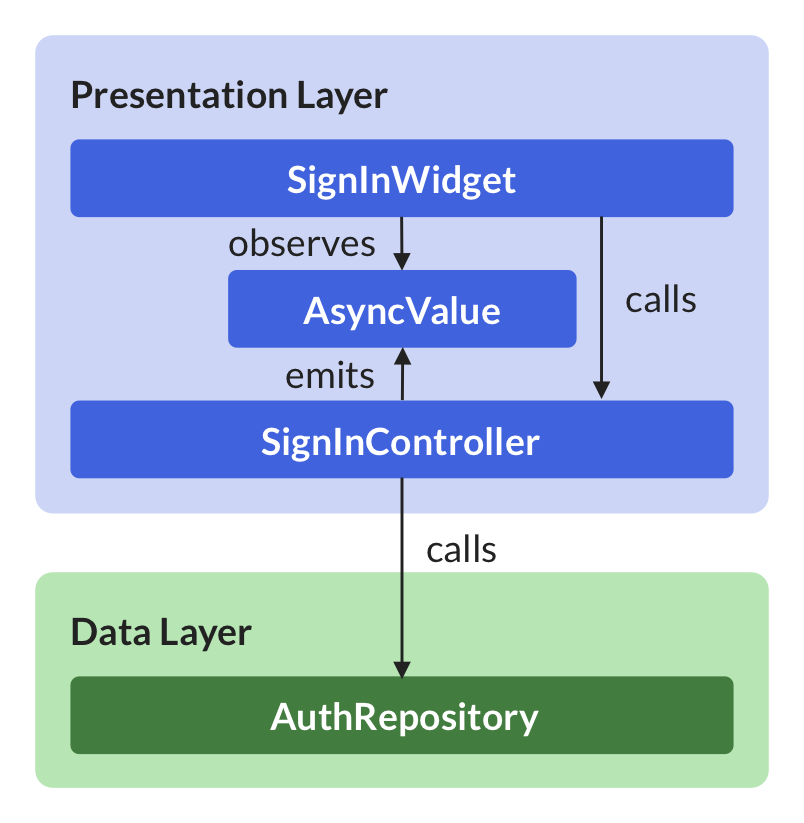
Here's a simplified version of the reference architecture for this specific example:

You can find the complete source code for this app on GitHub. For more info about how it is organized, read this: Flutter Project Structure: Feature-first or Layer-first?
The AuthRepository class
As a starting point, we can define a simple abstract class that contains three methods that we'll use to sign in, sign out, and check the authentication state:
abstract class AuthRepository {
  // emits a new value every time the authentication state changes
  Stream<AppUser?> authStateChanges();

  Future<AppUser> signInAnonymously();

  Future<void> signOut();
}
In practice, we also need a concrete class that implements
AuthRepository. This could be based on Firebase or any other backend. We can even implement it with a fake repository for now. For more details, see this article about the repository pattern.
For completeness, we can also define a simple AppUser model class:
/// Simple class representing the user UID and email.
class AppUser {
  const AppUser({required this.uid});
  final String uid;
  // TODO: Add other fields as needed (email, displayName etc.)
}
And if we use Riverpod, we also need a Provider that we can use to access our repository:
final authRepositoryProvider = Provider<AuthRepository>((ref) {
  // return a concrete implementation of AuthRepository
  return FakeAuthRepository();
});
Next up, let's focus on the sign-in screen.
The SignInScreen widget
Suppose we have a simple SignInScreen widget defined like so:
import 'package:flutter_riverpod/flutter_riverpod.dart';

class SignInScreen extends ConsumerWidget {
  const SignInScreen({Key? key}) : super(key: key);

  @override
  Widget build(BuildContext context, WidgetRef ref) {
    return Scaffold(
      appBar: AppBar(
        title: const Text('Sign In'),
      ),
      body: Center(
        child: ElevatedButton(
          child: Text('Sign in anonymously'),
          onPressed: () { /* TODO: Implement */ },
        ),
      ),
    );
  }
}
This is just a simple Scaffold with an ElevatedButton in the middle.
Note that since this class extends ConsumerWidget, in the build() method we have an extra ref object that we can use to access providers as needed.
Accessing the AuthRepository directly from our widget
As a next step, we can use the onPressed callback to sign in like so:
ElevatedButton(
  child: Text('Sign in anonymously'),
  onPressed: () => ref.read(authRepositoryProvider).signInAnonymously(),
)
This code works by obtaining the AuthRepository with a call to ref.read(authRepositoryProvider). and calling the signInAnonymously() method on it.
This covers the happy path (sign-in successful). But we should also account for loading and error states by:
- disabling the sign-in button and showing a loading indicator while sign-in is in progress
- showing a
SnackBaror alert if the call fails for any reason
The "StatefulWidget + setState" way
One simple way of addressing this is to:
- convert our widget into a
StatefulWidget(or rather,ConsumerStatefulWidgetsince we're using Riverpod) - add some local variables to keep track of state changes
- set those variables inside calls to
setState()to trigger a widget rebuild - use them to update the UI
Here's how the resulting code may look like:
class SignInScreen extends ConsumerStatefulWidget {
  const SignInScreen({Key? key}) : super(key: key);

  @override
  ConsumerState<SignInScreen> createState() => _SignInScreenState();
}

class _SignInScreenState extends ConsumerState<SignInScreen> {
  // keep track of the loading state
  bool isLoading = false;

  // call this from the `onPressed` callback
  Future<void> _signInAnonymously() async {
    try {
      // update the state
      setState(() => isLoading = true);
      // sign in using the repository
      await ref
          .read(authRepositoryProvider)
          .signInAnonymously();
    } catch (e) {
      // show a snackbar if something went wrong
      ScaffoldMessenger.of(context).showSnackBar(
        SnackBar(content: Text(e.toString())),
      );
    } finally {
      // check if we're still on this screen (widget is mounted)
      if (mounted) {
        // reset the loading state
        setState(() => isLoading = false);
      }
    }
  }

  ...
}
For a simple app like this, this is probably ok.
But this approach gets quickly out of hand when we have more complex widgets, as we are mixing business logic and UI code in the same widget class.
And if we want to handle loading in error states consistently across multiple widgets, copy-pasting and tweaking the code above is quite error-prone (and not much fun).
Instead, it would be best to move all these concerns into a separate controller class that can:
- mediate between our
SignInScreenand theAuthRepository - manage the widget state
- provide a way for the widget to observe state changes and rebuild itself as a result

So let's see how to implement it in practice.
A controller class based on AsyncNotifier
The first step is to create a AsyncNotifier subclass which looks like this:
class SignInScreenController extends AsyncNotifier<void> {
  @override
  FutureOr<void> build() {
    // no-op
  }
}
Or even better, we can use the new @riverpod syntax and let Riverpod Generator do the heavy lifting for us:
part 'sign_in_controller.g.dart';

@riverpod
class SignInScreenController extends _$SignInScreenController {
  @override
  FutureOr<void> build() {
    // no-op
  }
}

// A signInScreenControllerProvider will be generated by build_runner
Either way, we need to implement a build method, which returns the initial value that should be used when the controller is first loaded.
If desired, we can use the
buildmethod to do some asynchronous initialization (such as loading some data from the network). But if the controller is "ready to go" as soon as it is created (just like in this case), we can leave the body empty and set the return type toFuture<void>.
Implementing the method to sign in
Next up, let's add a method that we can use to sign in:
@riverpod
class SignInScreenController extends _$SignInScreenController {
  @override
  FutureOr<void> build() {
    // no-op
  }

  Future<void> signInAnonymously() async {
    final authRepository = ref.read(authRepositoryProvider);
    state = const AsyncLoading();
    state = await AsyncValue.guard(() => authRepository.signInAnonymously());
  }
}
A few notes:
- We obtain the
authRepositoryby callingref.readon the corresponding provider (refis a property of the baseAsyncNotifierclass) - Inside
signInAnonymously(), we set the state toAsyncLoadingso that the widget can show a loading UI - Then, we call
AsyncValue.guardandawaitfor the result (which will be eitherAsyncDataorAsyncError)
AsyncValue.guardis a handy alternative totry/catch. For more info, read this: Use AsyncValue.guard rather than try/catch inside your AsyncNotifier subclasses
And as an extra tip, we can use a method tear-off to simplify our code even further:
// pass authRepository.signInAnonymously directly using tear-off
state = await AsyncValue.guard(authRepository.signInAnonymously);
This completes the implementation of our controller class, in just a few lines of code:
@riverpod
class SignInScreenController extends _$SignInScreenController {
  @override
  FutureOr<void> build() {
    // no-op
  }

  Future<void> signInAnonymously() async {
    final authRepository = ref.read(authRepositoryProvider);
    state = const AsyncLoading();
    state = await AsyncValue.guard(authRepository.signInAnonymously);
  }
}

// A signInScreenControllerProvider will be generated by build_runner
Note about the relationship between types
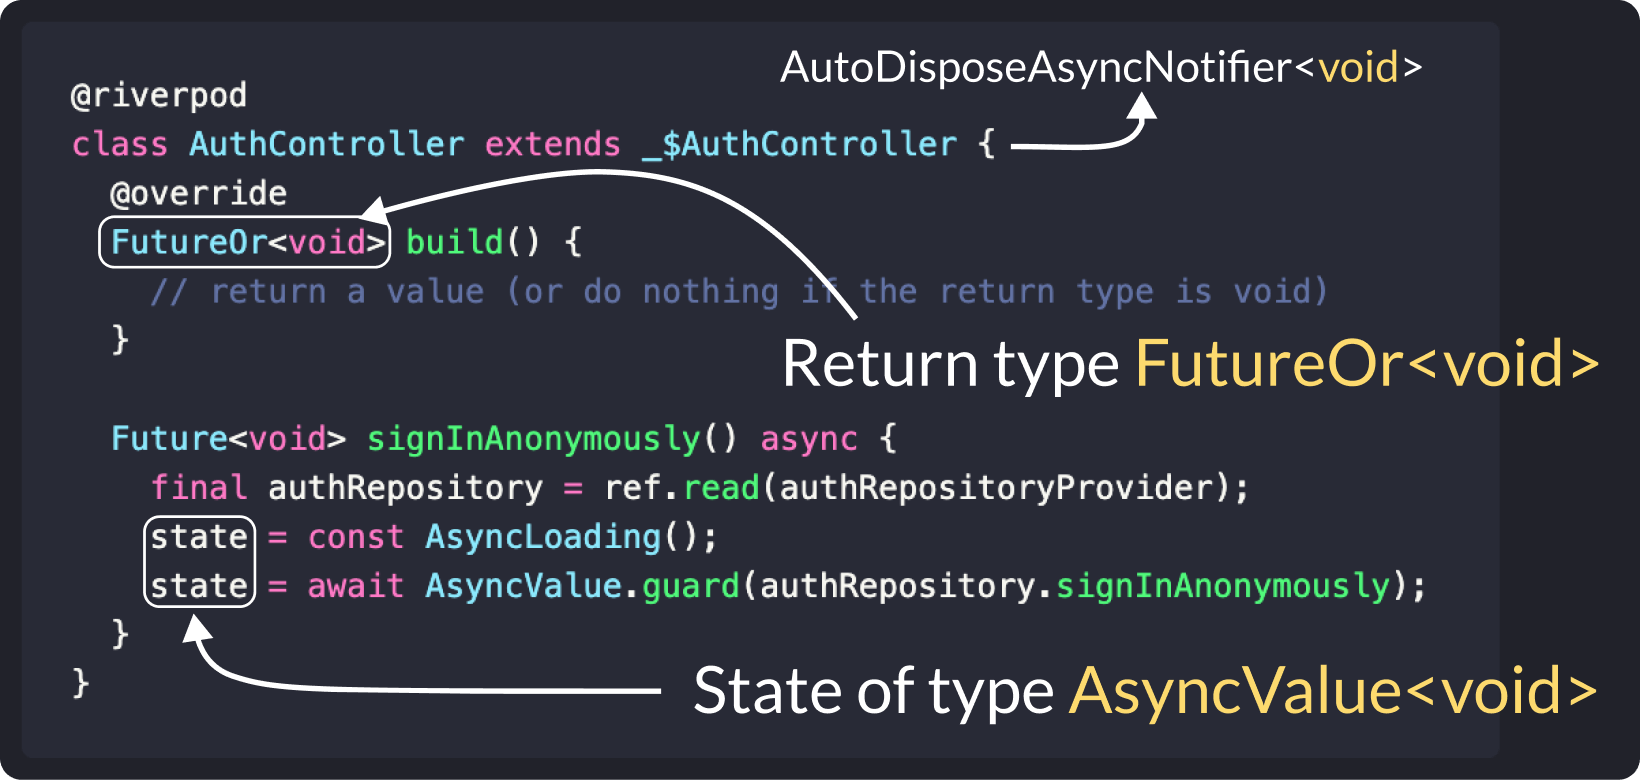
Note that there is a clear relationship between the return type of the build method and the type of the state property:

In fact, using AsyncValue<void> as the state allows us to represent three possible values:
- default (not loading) as
AsyncData(same asAsyncValue.data) - loading as
AsyncLoading(same asAsyncValue.loading) - error as
AsyncError(same asAsyncValue.error)
If you're not familiar with
AsyncValueand its subclasses, read this: How to handle loading and error states with StateNotifier & AsyncValue in Flutter
Time to get back to our widget class and wire everything up!
Using our controller in the widget class
Here's an updated version of the SignInScreen that uses our new SignInScreenController class:
class SignInScreen extends ConsumerWidget {
  const SignInScreen({Key? key}) : super(key: key);

  @override
  Widget build(BuildContext context, WidgetRef ref) {
    // watch and rebuild when the state changes
    final AsyncValue<void> state = ref.watch(signInScreenControllerProvider);
    return Scaffold(
      appBar: AppBar(
        title: const Text('Sign In'),
      ),
      body: Center(
        child: ElevatedButton(
          // conditionally show a CircularProgressIndicator if the state is "loading"
          child: state.isLoading
              ? const CircularProgressIndicator()
              : const Text('Sign in anonymously'),
          // disable the button if the state is loading
          onPressed: state.isLoading
              ? null
              // otherwise, get the notifier and sign in
              : () => ref
                  .read(signInScreenControllerProvider.notifier)
                  .signInAnonymously(),
        ),
      ),
    );
  }
}
Note how in the build() method we watch our provider and rebuild the widget when the state changes.
And in the onPressed callback we read the provider's notifier and call signInAnonymously().
And we can also use the isLoading property to conditionally disable the button while sign-in is in progress.
We're almost done, and there's only one thing left to do.
Listening to state changes
Right at the top of the build method, we can add this:
@override
Widget build(BuildContext context, WidgetRef ref) {
  ref.listen<AsyncValue>(
    signInScreenControllerProvider,
    (_, state) {
      if (!state.isLoading && state.hasError) {
        ScaffoldMessenger.of(context).showSnackBar(
          SnackBar(content: Text(state.error.toString())),
        );
      }
    },
  );
  // rest of the build method
}
We can use this code to call a listener callback whenever the state changes.
This is useful for showing an error alert or a SnackBar if an error occurs when signing in.
Bonus: An AsyncValue extension method
The listener code above is quite useful and we may want to reuse it in multiple widgets.
To do that, we can define this AsyncValue extension:
extension AsyncValueUI on AsyncValue {
  void showSnackbarOnError(BuildContext context) {
    if (!isLoading && hasError) {
      ScaffoldMessenger.of(context).showSnackBar(
        SnackBar(content: Text(error.toString())),
      );
    }
  }
}
And then, in our widget, we can just import our extension and call this:
ref.listen<AsyncValue>(
  signInScreenControllerProvider,
  (_, state) => state.showSnackbarOnError(context),
);
Conclusion
By implementing a custom controller class based on AsyncNotifier, we've separated our business logic from the UI code.
As a result, our widget class is now completely stateless and is only concerned with:
- watching state changes and rebuilding as a result (with
ref.watch) - responding to user input by calling methods in the controller (with
ref.read) - listening to state changes and showing errors if something goes wrong (with
ref.listen)
Meanwhile, the job of our controller is to:
- talk to the repository on behalf of the widget
- emit state changes as needed
And since the controller doesn't depend on any UI code, it can be easily unit tested, and this makes it an ideal place to store any widget-specific business logic.
In summary, widgets and controllers belong to the presentation layer in our app architecture:

But there are three additional layers: data, domain, and application, and you can learn about them here:
- Flutter App Architecture: The Repository Pattern
- Flutter App Architecture: The Domain Model
- Flutter App Architecture: The Application Layer
Or if you want to dive deeper, check out my Flutter Foundations course. 👇
Flutter Foundations Course Now Available
I launched a brand new course that covers Flutter app architecture in great depth, along with other important topics like state management, navigation & routing, testing, and much more:


