Lately, more Flutter developers have been running Dart on the server. And it’s no wonder: who doesn’t like using the same language on the frontend and backend? Dart has been around on the server for a long time, but new tools are shining a light on it. Companies like Very Good Ventures with Dart Frog, Serverpod, Invertase with Globe and Dart Edge, and Celest are leading the charge.
A much older option is Shelf. While it isn’t talked about much, Shelf is an easy-to-use, lightweight server framework maintained by the Dart team. This makes it ideal for both simple and complex apps where long-term API stability is important.
In this tutorial, you’ll learn how to:
- Develop a server app with Dart Shelf.
- Route and handle HTTP requests.
- Work with the OpenAI API.
- Keep your API keys safe.
- Deploy your app on Globe.dev.
- Toggle between local and production endpoints using flavors.
Get ready to dive into server-side Dart and pick up some valuable skills!
Why Use a Server for API Keys
Remember the article on storing API keys in Flutter? You learned how to keep environment variables and compile-time flags on your device. But that's not the safest place for secret keys. They belong on a server.
It turns out that pulling API keys from the client app is pretty straightforward. All you need to do is install the Charles Proxy root certificate on your phone, and then you can intercept the API key in the authorization header when making calls to the API.
Take the OpenAI API, for example. Their best practice guide warns:
Exposing your OpenAI API key in client-side environments like browsers or mobile apps allows malicious users to take that key and make requests on your behalf – which may lead to unexpected charges or compromise of certain account data. Requests should always be routed through your own backend server where you can keep your API key secure.
In this guide, you'll use Shelf as your secret-keeping server to handle OpenAI API calls for a Flutter app. And you'll learn how to deploy your server on Globe.dev to keep your OpenAI API key under wraps.
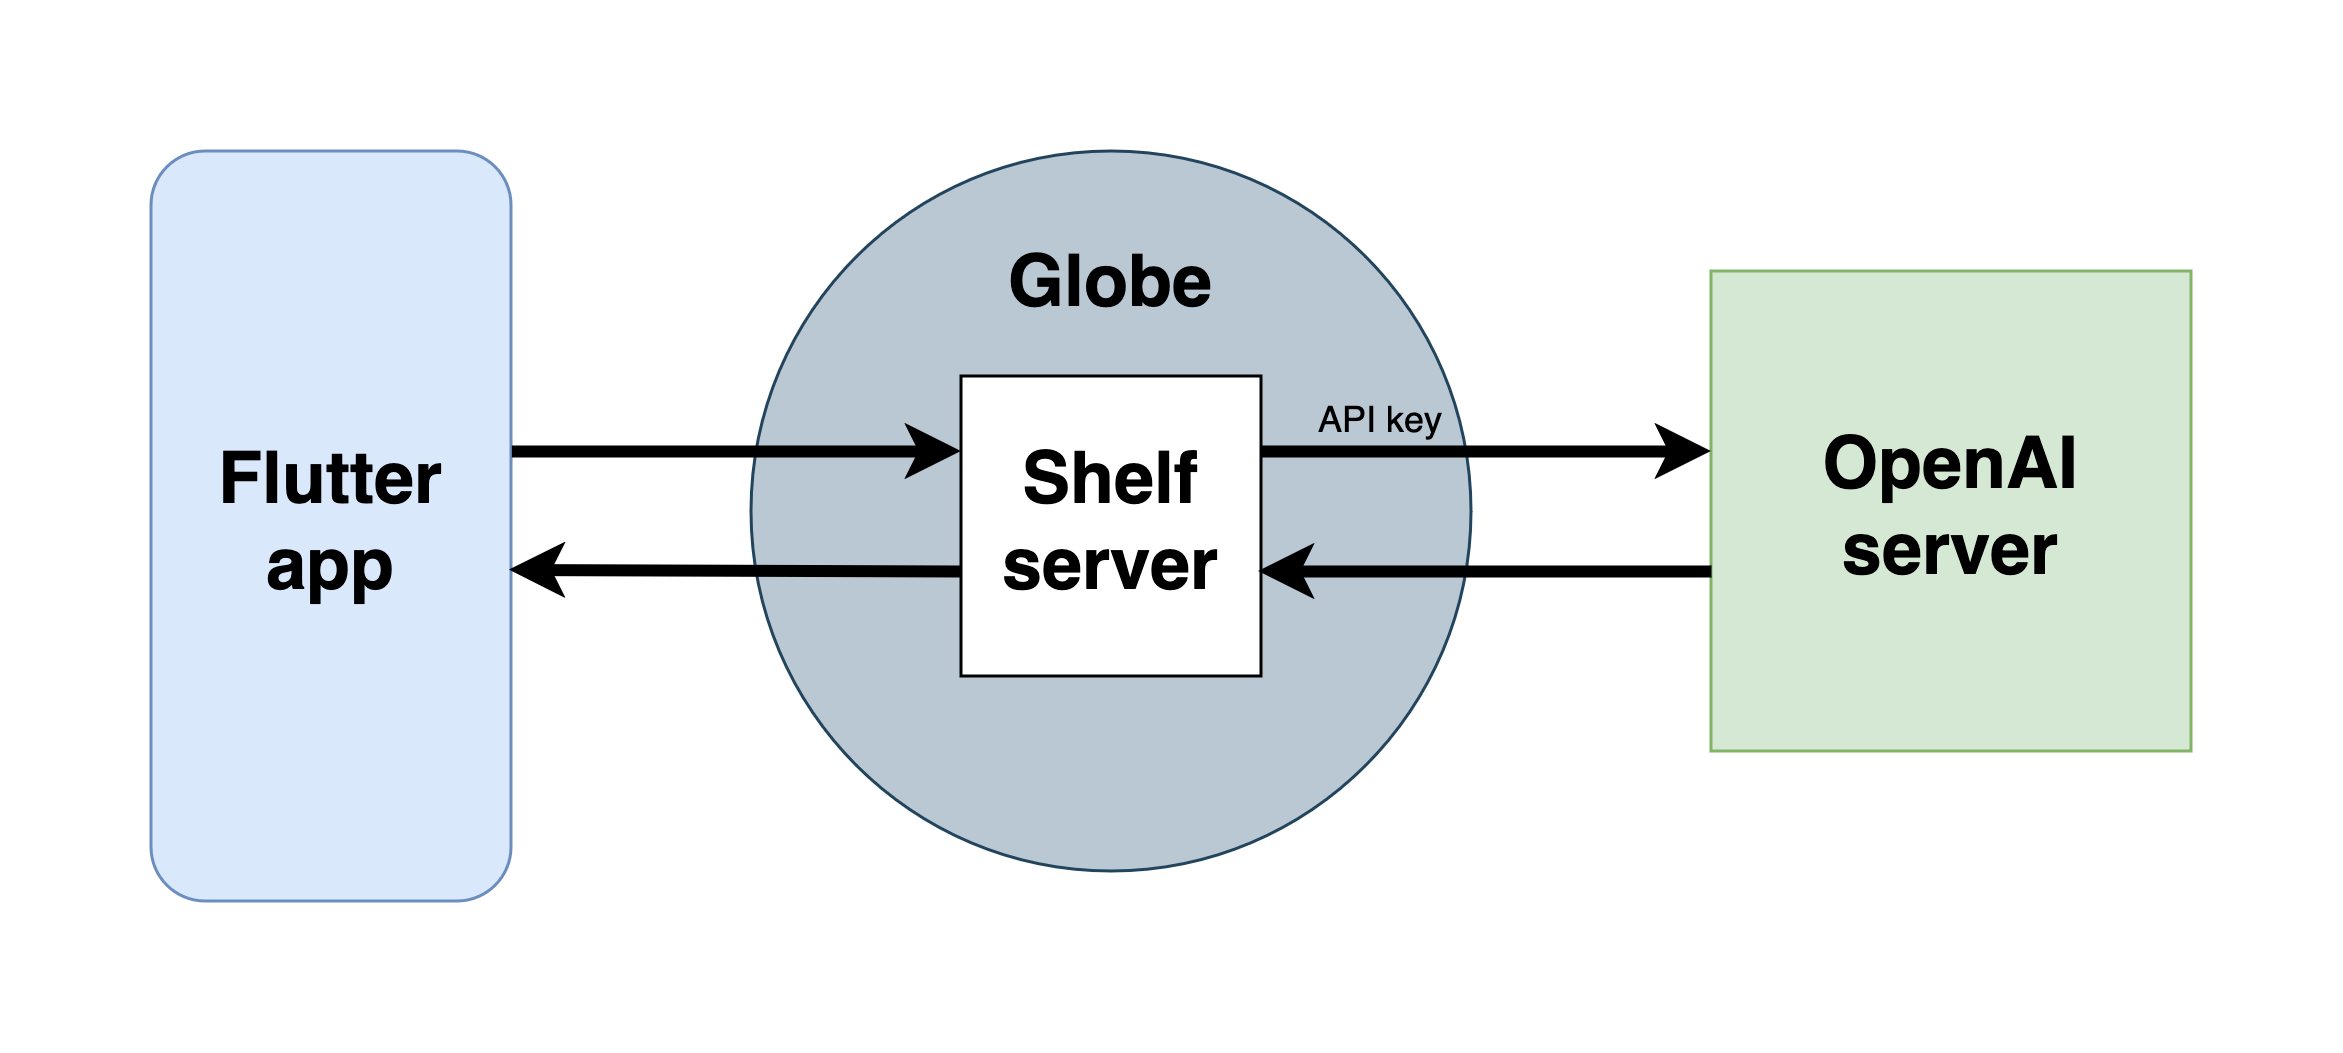
Here's a diagram showing how the Shelf backend processes incoming requests from the Flutter client, talks to OpenAI, and sends the response back to the client:
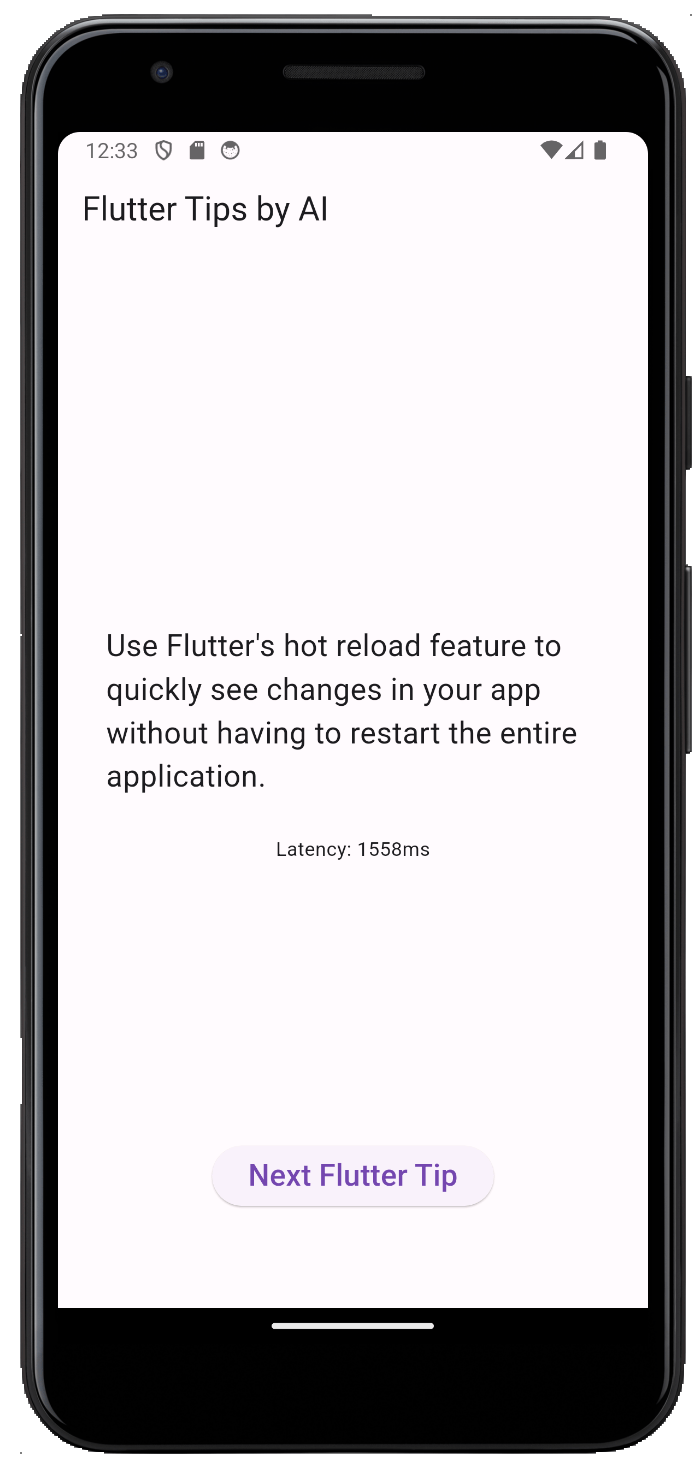
The frontend will be a Flutter Tips app. You’ll tap a button to get a helpful tip about Flutter app development:
Let’s get started!
Setting Up Your Shelf Server
Start by creating a new Dart server project with this terminal command:
dart create -t server-shelf shelf_backend
The -t server-shelf option tells Dart to use the Shelf server template when creating your project. This adds the shelf and shelf_router packages to the pubspec.yaml and generates some basic server code.
The project structure should now look like this:
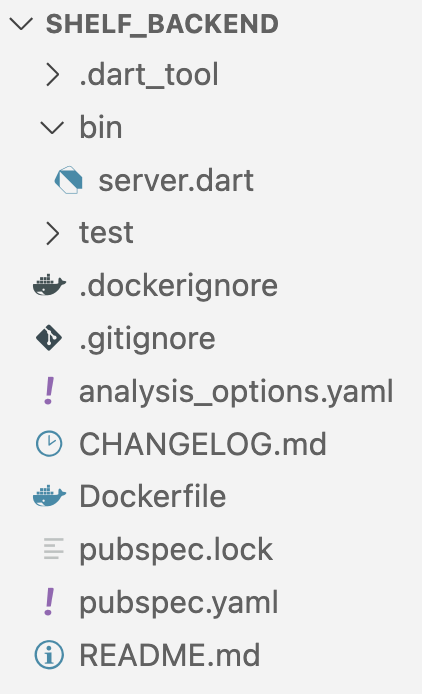
It's pretty similar to a typical Flutter project, but instead of the lib folder, you've got bin.
Sure, you could cram all your server code into bin/server.dart, but let's keep things tidy. Create a lib folder at the project's root, then add two new files inside:
middleware.dartroute_handler.dart
You’ll fill in the code for these shortly.
You might notice files for Docker, like
Dockerfileand.dockerignore. Since we're not using Docker this time, feel free to delete them.
Understanding Server Routes
Routes are the heart of server navigation, much like how URLs guide us on the web:

Remember this guide about Flutter Deep Linking? Just like a URL, server routes have various elements, but the path is key—it's like a command telling the server what action to take.
Based on the path, you can direct incoming requests to different parts of the server.
Here are some example paths your server might handle:
/signin/users/users/42/articles
On the server side, these paths are also called routes. But in addition to the path, a route also includes an HTTP method. There are many different HTTP methods, but the most common ones are GET, POST, PUT, and DELETE.
Together, a method plus a path give you a full route. Here are examples:
POST /signinGET /usersGET /users/42DELETE /users/42
As you can see, you can have the same method with different paths or the same path with different methods.
In the simple app you’ll make today, there will only be a single route:
GET /tip
Your server's job here is simple. When it hears this call, it returns a handy Flutter tip.
Routing with Shelf Made Easy
In Shelf, a Router object is your traffic controller for routes.
Take the route examples we discussed earlier. Here's how you'd set them up with Shelf:
final router = Router()
  ..post('/signin', _signInHandler)
  ..get('/users', _getAllUsersHandler)
  ..get('/users/<id>', _getUserHandler)
  ..delete('/users/<id>', _deleteUserHandler);
In this snippet, functions like _signInHandler and _getAllUsersHandler are in charge of their routes. Laying out your routes this way lets you see your backend API's structure at a glance—a big plus with Shelf.
Now, let's dive into coding.
Open lib/route_handler.dart and add the following:
import 'package:shelf/shelf.dart';
import 'package:shelf_router/shelf_router.dart';

final router = Router()
    ..get('/tip', _tipHandler);

Future<Response> _tipHandler(Request request) async {
  // TODO: Handle the request
}
You've now set up a GET /tip route. Shelf will funnel any requests for this route to the _tipHandler function.
In this handler, your mission is to examine the incoming Request and return an appropriate Response. But hold on—there's another step to handle before you fill in that TODO.
Getting an API key for OpenAI
To deliver Flutter tips in your app, you'll tap into OpenAI's API. Here’s how you get the necessary API key:
Name your key and hit Create secret key.
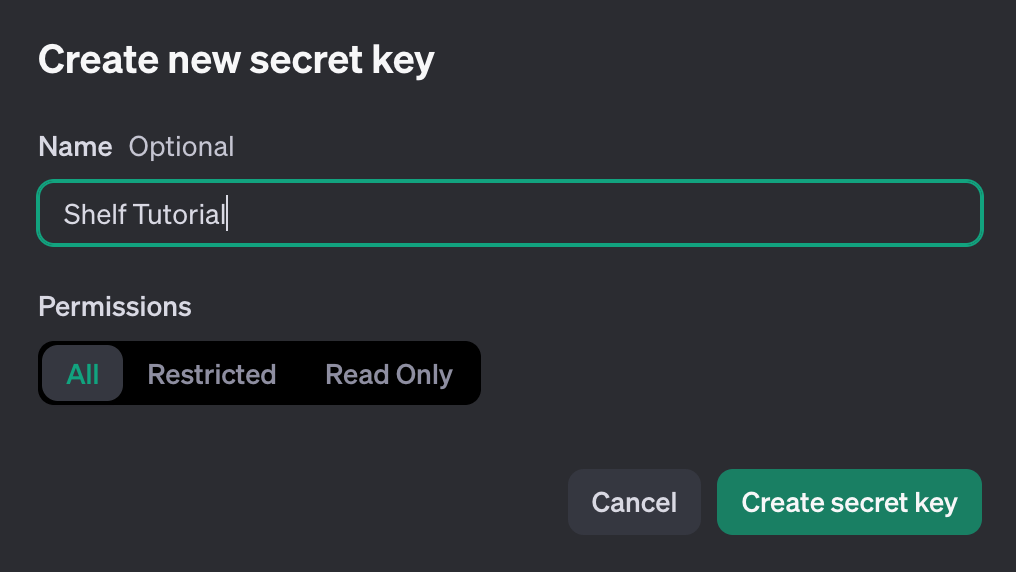
Once it pops up, copy your new key and stash it somewhere safe.
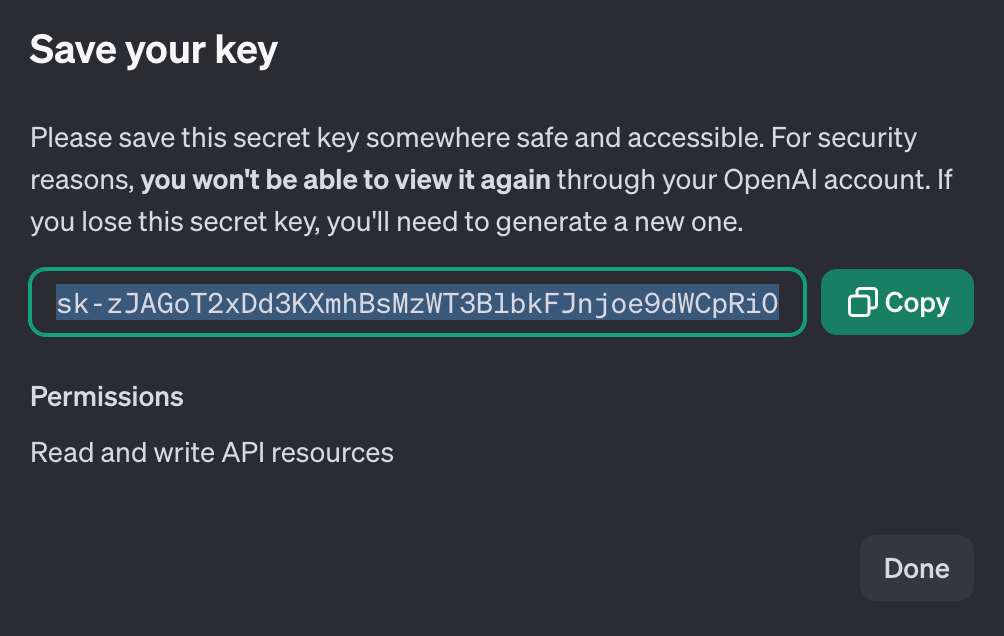
A word of caution: never commit your key to GitHub unless it's safely hidden in a .gitignore'd file. Your OpenAI API key is as private as it gets—if it falls into the wrong hands, it can cost you money.
You'll securely hand off this key to Globe as we progress. Stay tuned.
Accessing the API Key as an Environment Variable
Armed with your API key, you're set to bridge your Dart code with OpenAI.
In lib/route_handler.dart, import dart:io, and then add the following to _tipHandler:
final apiKey = Platform.environment['OPENAI_API_KEY'];
Rather than hardcoding your API key directly in the code (never do this!), the line above reads it at runtime from an environment variable called OPENAI_API_KEY. Hang tight—we'll cover setting up this variable soon.
Sending the Request to OpenAI
Time to set up the request to OpenAI's API. Here's how.
Add the http package to your pubspec.yaml, along with these imports at the top of route_handler.dart:
import 'dart:convert';
import 'package:http/http.dart' as http;
Next, update your _tipHandler function with the following:
final url = Uri.parse('https://api.openai.com/v1/chat/completions');
final headers = {
  'Content-Type': 'application/json',
  'Authorization': 'Bearer $apiKey',
};
final data = {
  'model': 'gpt-3.5-turbo',
  'messages': [
    {
      'role': 'user',
      'content': 'Give me a random tip about using Flutter and Dart. '
          'Keep it to one sentence.',
    }
  ],
  'temperature': 1.0,
};

final response = await http.post(
  url,
  headers: headers,
  body: jsonEncode(data),
);
Here are a few things to note:
- The API key goes in a bearer authorization header.
- The
gpt-3.5-turbomodel is cost-effective, but you can pick from various models. - The
contentfield is your question to the AI. - The
temperatureis a number between 0 and 1, where values closer to 1 produce more random responses. - While OpenAI requires a POST request, your Shelf server will output the result when called via GET.
Handling the OpenAI Response
Finish off your _tipHandler by dealing with OpenAI's response and then sending back the right message to your client.
Drop this at the end of your _tipHandler:
if (response.statusCode == 200) {
  final responseBody = jsonDecode(response.body);
  final messageContent = responseBody['choices'][0]['message']['content'];
  return Response.ok(messageContent);
} else {
  return Response.internalServerError(
    body: 'OpenAI request failed: ${response.body}',
  );
}
A 200 status signals all is good. If something's wrong, you'll return an internalServerError, which is a 500 status code. Peek at the MDN web docs for a rundown on HTTP status codes. Knowing them is key to designing better APIs.
Adding the Middleware
Recall that your Shelf API only handles a single route:
GET /tip
But what if someone hits a path you haven't set up, like GET /pinkelephants? Shelf has your back, defaulting to a 404 Not Found response for all undefined routes.
However, if someone tries POST /tip, you've got a mismatch—right path, wrong method. Shelf would still say 404 Not Found, but 405 Method Not Allowed fits better. You could add that logic to the beginning of your _tipHandler function, but what if you had ten route handlers? Would you add the check to each of them? There’s a better way. It’s called middleware.
Middleware steps in before the route handlers, letting you:
- Log requests
- Customize headers
- Block requests without proper authentication
- Respond with specific status codes
Let's tackle that last point.
Open your empty lib/middleware.dart and plug in this code:
import 'package:shelf/shelf.dart';

Middleware rejectBadRequests() {
  return (innerHandler) {
    return (request) {
      if (request.method != 'GET') {
        return Response(405, body: 'Method Not Allowed');
      }
      return innerHandler(request);
    };
  };
}
Wondering about all those nested return statements?
Shelf defines Middleware and Handler like this:
typedef Middleware = Handler Function(Handler innerHandler);
typedef Handler = FutureOr<Response> Function(Request request);
Both are fancy terms for higher-order functions. Middleware takes a Handler and returns a Handler, while a Handler accepts a Request and spits out a Response.
So, rejectBadRequests boils down to this: if you're not a GET, you're a 405. Otherwise, carry on. That's the Shelf pipeline—a cascade of handlers that eventually end with a response.
Let's start constructing your pipeline.
Assembling the Pipeline and Launching the Server
Time to put it all together. Open bin/server.dart and swap out the current contents with this:
import 'dart:io';
import 'package:shelf/shelf.dart';
import 'package:shelf/shelf_io.dart';
import 'package:shelf_backend/middleware.dart';
import 'package:shelf_backend/route_handler.dart';

void main(List<String> args) async {
  final ip = InternetAddress.anyIPv4;

  final handler = Pipeline()
      .addMiddleware(logRequests())
      .addMiddleware(rejectBadRequests())
      .addHandler(router.call);

  final port = int.parse(Platform.environment['PORT'] ?? '8080');
  final server = await serve(handler, ip, port);
  print('Server listening on port ${server.port}');
}
Breaking it down:
- You've built a
Pipelineof handlers that'll process and respond to requests. Included are two middlewares: the in-houserejectBadRequests()and Shelf's handylogRequests(), which prints all incoming requests to the console. - The
servefunction gets the server up and running with your handler, listening on the specified IP and port.
Your server's now ready to handle requests, logging each one and rejecting any non-GET methods.
Testing the Server Locally
Before deploying on Globe, it's crucial to test your server locally.
Start by setting your OpenAI API key as an environment variable. Replace <your api key> with the actual key you've saved:
# On Windows
set OPENAI_API_KEY=<your api key>

# On Mac or Linux
export OPENAI_API_KEY=<your api key>
Then, fire up the server with this command in your project's root:
dart run bin/server.dart
Alternatively, you can set the API key inline when running the server:
# On Windows
$env:OPENAI_API_KEY="<your api key>"; dart run bin/server.dart

# On Mac or Linux
OPENAI_API_KEY=<your api key> dart run bin/server.dart
Look for the Server listening on port 8080 confirmation.
Next, launch your browser and head to:
If everything is set up correctly, you should see a Flutter tip:
Be consistent in using named parameters in functions to improve readability and maintainability of your code.

Note about Environment Variables vs Dart-Define
As you’ve seen, the environment variable is set before starting the Dart server:
OPENAI_API_KEY=<your api key> dart run bin/server.dart
And inside the route handler, you’re reading the environment variable like this:
final apiKey = Platform.environment['OPENAI_API_KEY'];
Platform.environment checks the system's environment for the variables, whether you're on Windows, Mac, or Linux.
Alternatively, Dart allows compile-time constants using a --define flag:
dart run --define=OPENAI_API_KEY=<your api key> bin/server.dart
For Flutter apps, this would be --dart-define. To access such a constant, you'd use:
final apiKey = String.fromEnvironment['OPENAI_API_KEY'];
But be aware that hosting services like Globe only work with environment variables, not compile-time flags. And that’s the reason we’re using Platform.environment. 👌
Now that the server is working, it’s time to build the frontend.
Assembling the Flutter Frontend
Assuming you’re already familiar with Flutter, this section will keep the comments to a minimum.
Setting up the File Structure
First off, let’s create a new Flutter app:
flutter create flutter_frontend -e
Then, create the following folders and files:
lib/
  home/
    flutter_tips_loader.dart
    flutter_tips_screen.dart
  web_client/
    web_client.dart
  main.dart
Creating the Web Client
Add the http package to your pubspec.yaml file:
dependencies:
  http: ^1.2.1
Then, open web_client/web_client.dart and add the following code:
import 'dart:io';

import 'package:http/http.dart' as http;

// A web client we can use to fetch tips from our Dart server
class WebClient {
  // https://developer.android.com/studio/run/emulator-networking
  String get _host =>
      Platform.isAndroid ? 'http://10.0.2.2:8080' : 'http://127.0.0.1:8080';

  Future<String> fetchTip() async {
    final response = await http.get(Uri.parse('$_host/tip'));
    if (response.statusCode != 200) {
      throw ClientException('Error getting tip: ${response.body}');
    }
    return response.body;
  }
}

class ClientException implements Exception {
  ClientException(this.message);
  final String message;
}
Be mindful that during testing, Android emulators use 10.0.2.2 for localhost (as explained here), while other platforms stick with 127.0.0.1.
You'll adjust the host endpoints later to align with your development and production environments when deploying to Globe.dev.
Simple State Management
Open home/flutter_tips_loader.dart and add the following:
import 'package:flutter/foundation.dart';
import '../web_client/web_client.dart';

class FlutterTipsLoader {
  final webClient = WebClient();
  final loadingNotifier = ValueNotifier<RequestState>(Loading());

  Future<void> requestTip() async {
    loadingNotifier.value = Loading();
    try {
      final stopwatch = Stopwatch()..start();
      final tip = await webClient.fetchTip();
      stopwatch.stop();
      loadingNotifier.value = Success(tip, stopwatch.elapsed);
    } on ClientException catch (e) {
      loadingNotifier.value = Failure(e.message);
    }
  }
}

sealed class RequestState {}

class Loading extends RequestState {}

class Success extends RequestState {
  Success(this.tip, this.responseTime);
  final String tip;
  final Duration responseTime;
}

class Failure extends RequestState {
  Failure(this.message);
  final String message;
}
A few pointers:
- No need for external packages for state management in this simple case.
ValueNotifiersuits perfectly, as it's straightforward and comes with Flutter. It'll cycle throughLoadingand thenSuccessorFailurewhile notifying listeners with every value change. - While an enum could represent states, the sealed class
RequestStateis a better fit and lets you embed the actual tip or error message within the state, a cleaner approach than juggling separate variables for state and data.
If you're not familiar with sealed classes and other recent Dart 3 features, read: What’s New in Dart 3: Introduction.
Building the UI
Open home/flutter_tips_screen.dart and set up the UI (for brevity, let’s skip the styling code):
import 'package:flutter/material.dart';
import 'flutter_tips_loader.dart';

class FlutterTipsScreen extends StatefulWidget {
  const FlutterTipsScreen({super.key});

  @override
  State<FlutterTipsScreen> createState() => _FlutterTipsScreenState();
}

class _FlutterTipsScreenState extends State<FlutterTipsScreen> {
  final _loader = FlutterTipsLoader();

  @override
  void initState() {
    // 1. Load the first tip on page load
    _loader.requestTip();
    super.initState();
  }

  @override
  Widget build(BuildContext context) {
    return Scaffold(
      appBar: AppBar(title: const Text('Flutter Tips by AI')),
      body: Center(
        child: Column(
          children: [
            const Spacer(),
            // 2. Use ValueListenableBuilder to rebuild the UI on state change
            ValueListenableBuilder<RequestState>(
              valueListenable: _loader.loadingNotifier,
              builder: (context, state, child) {
                // 3. Map each state to the appropriate widget
                return switch (state) {
                  Loading() => const LinearProgressIndicator(),
                  Failure() => Text(state.message),
                  Success() => Column(
                      children: [
                        Text(state.tip),
                        const SizedBox(height: 24.0),
                        Text(
                          'Latency: ${state.responseTime.inMilliseconds}ms',
                        ),
                      ],
                    ),
                };
              },
            ),
            const Spacer(),
            ElevatedButton(
              // 4. Load the next tip
              onPressed: _loader.requestTip,
              child: const Text('Next Flutter Tip'),
            ),
            const Spacer(),
          ],
        ),
      ),
    );
  }
}
As you can see, ValueNotifier and ValueListenableBuilder are paired to ensure the widget rebuilds when the state changes, using a switch expression to map the RequestState to the desired UI.
Finally, open lib/main.dart and replace its contents:
import 'package:flutter/material.dart';
import 'home/flutter_tips_screen.dart';

void main() {
  runApp(const MainApp());
}

class MainApp extends StatelessWidget {
  const MainApp({super.key});

  @override
  Widget build(BuildContext context) {
    return const MaterialApp(
      debugShowCheckedModeBanner: false,
      home: FlutterTipsScreen(),
    );
  }
}
Testing the Flutter client
With your Shelf server still running, start the Flutter client. If all goes well, your screen will present a Flutter tip, along with the request's response time.

Since your app works locally, you’re ready to deploy your server.
Deploying Your Server Online
When it comes to deploying your server app, you have many available options:
- Docker Image: Bundle your Dart server and its dependencies into a Docker image, deployable on cloud platforms like Google Cloud Run, Amazon ECS, Azure Container Instances, among others.
- Virtual machine (VM) or virtual private server (VPS): This more hands-on approach involves setting up a virtual machine or server remotely via SSH, similar to your local environment. You can run Dart in JIT for development or compile to AOT for production. Major providers include Azure Virtual Machines, Google Compute Engine, Amazon EC2, and DigitalOcean Droplets.
- Dedicated Server: This is a heavy-duty solution where you either lease an entire server in a data center or manage your own hardware. While it provides full control, it comes with higher costs and demands more technical know-how. The deployment process is similar to that on a VM or VPS once you have access to the server.
- Global Edge Network: With this setup, your app is distributed to many servers that are closer to your end users, akin to what CDNs do for static resources. If you want to run serverless Dart functions, you can use Dart Edge, which supports Cloudflare Workers, Vercel Edge Functions & Supabase Edge Functions (at the time of writing, Google Cloud’s Dart Function Framework and Celest Functions do not run on the edge). Serverless functions have their place, but today, you have a server to deploy, which is, by definition, not serverless. That leaves you with Globe, a platform specifically designed to deploy Dart servers to the edge.
Though each option has merits, Globe stands out for ease of use, especially for deploying your Shelf server. Let's proceed with that.
For a more detailed overview of these deployment options, read: 4 Ways to deploy your Dart backend.
Setting up Globe
Visit Globe.dev and sign up for a new account.
Then, run the following command in your terminal:
dart pub global activate globe_cli
This will allow you to run other globe commands.
Next up, authenticate with the Globe CLI:
globe login
You’re now ready to deploy your server.
Creating a Preview Deployment on Globe
From the root folder of your server project, run this command to deploy your Dart server:
globe deploy
You’ll be presented with a series of questions. Accept the defaults for the first few options:
Link this project to Globe? (Yes)
Please select a project you want to deploy to:
  Create a new project
Specify which directory your project is in: (./)
Enter the name of the project: (shelf_backend)
Would you like to run a custom build command? (No)
While running the step above, you may encounter this CLI bug that causes the deployment to fail with the error “Redirect loop detected”. To work around this, create a new Globe project by connecting your GitHub repo and follow the setup steps. Then, a new deployment will be created every time you run
git push.
When the CLI asks for the entrypoint file, specify bin/server.dart:
Enter a Dart entrypoint file: (lib/main.dart) bin/server.dart
After that, wait a minute while the Globe CLI deploys your project.
When it’s finished, you’ll get a link to the deployed server that looks like this:
https://shelf-backend-d3ad-kddcoty-yourusername.globeapp.dev
Hitting this link in your browser will likely show Route not found since your server doesn't handle the root (/) path.
Add /tip to the end of the URL and try again.
This time, you’ll see:
OpenAI request failed: {
    "error": {
        "message": "Incorrect API key provided: null. You can find your API key at https://platform.openai.com/account/api-keys.",
        "type": "invalid_request_error",
        "param": null,
        "code": "invalid_api_key"
    }
}
Your server can’t find the OpenAI API key in the environment variables. That’s because you haven’t told Globe what it is yet.
Setting the OpenAI API key as an Environment Variable in Globe
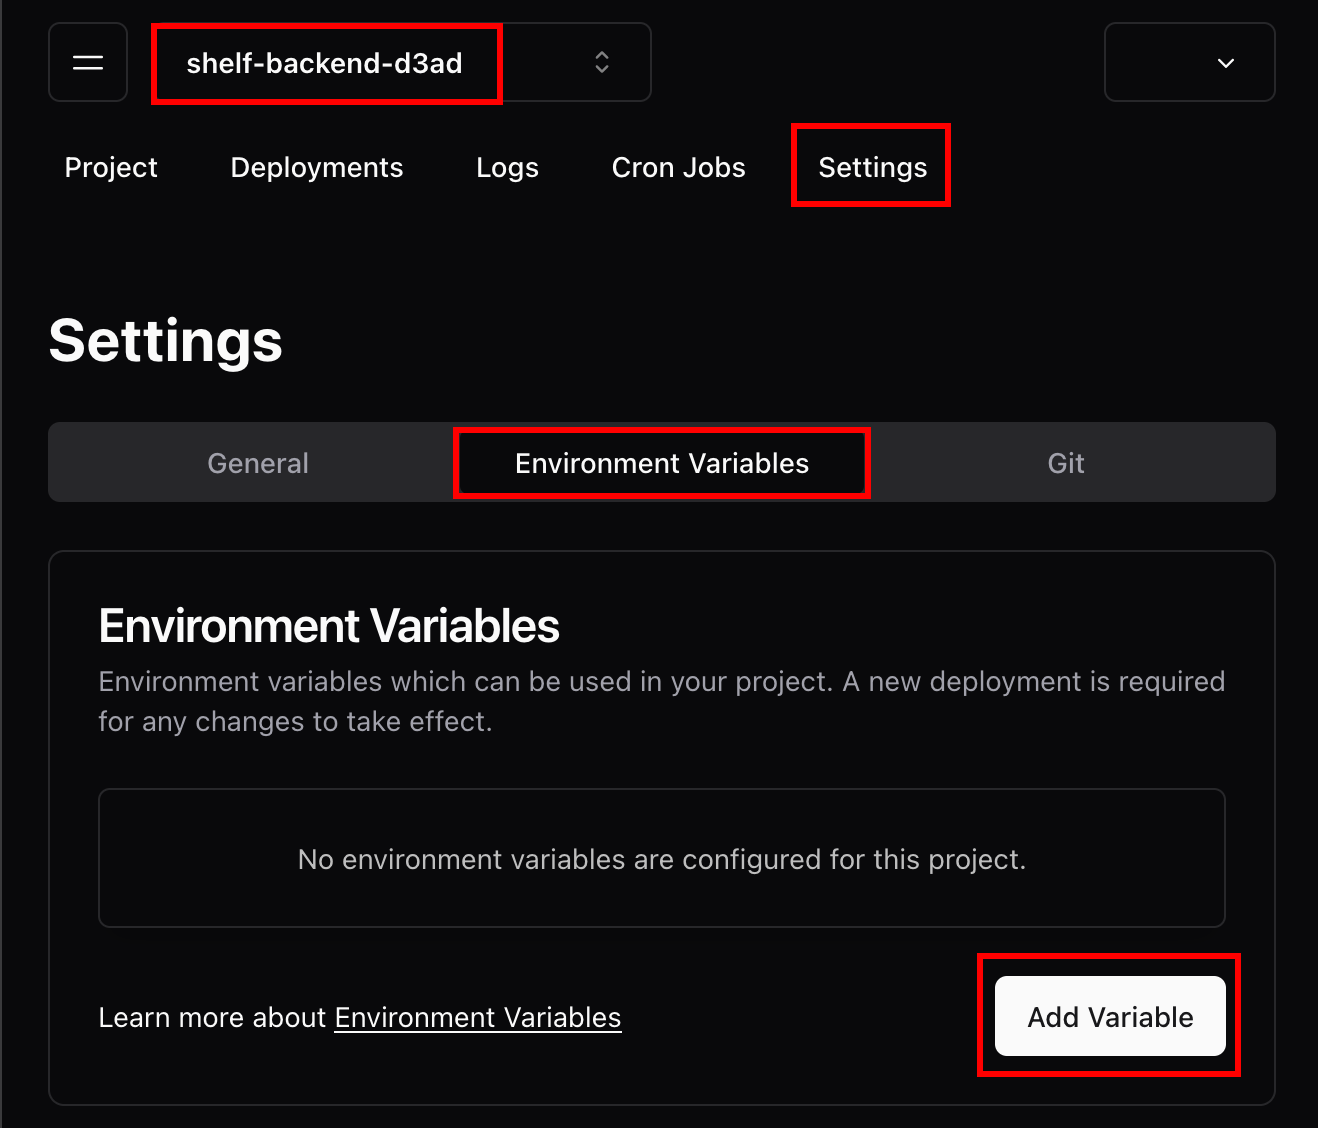
Log in to the globe.dev dashboard and select your project. Then go to Settings > Environment Variables and click Add Variable:
Enter OPENAI_API_KEY for the variable name and paste your OpenAI API key as its value:
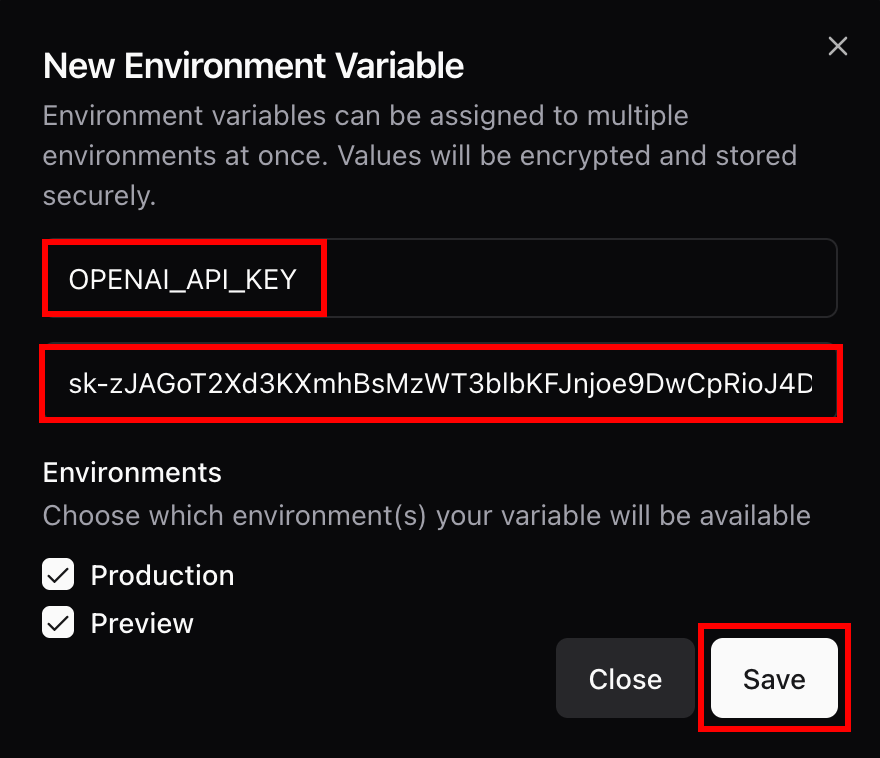
To apply the new environment variable, you'll need to redeploy your server. Run:
globe deploy
from the root of your project. This gives you a fresh deployment URL. Append /tip to this new URL and check it in your browser—you should now be greeted with a Flutter tip.
After verifying that the preview deployments work, it's time to move to production:
globe deploy --prod
You’ll be given a new deployment URL, but this, too, will change the next time you deploy. What you need is the non-changing domain URL. You can find this in your project’s main page under Domains:
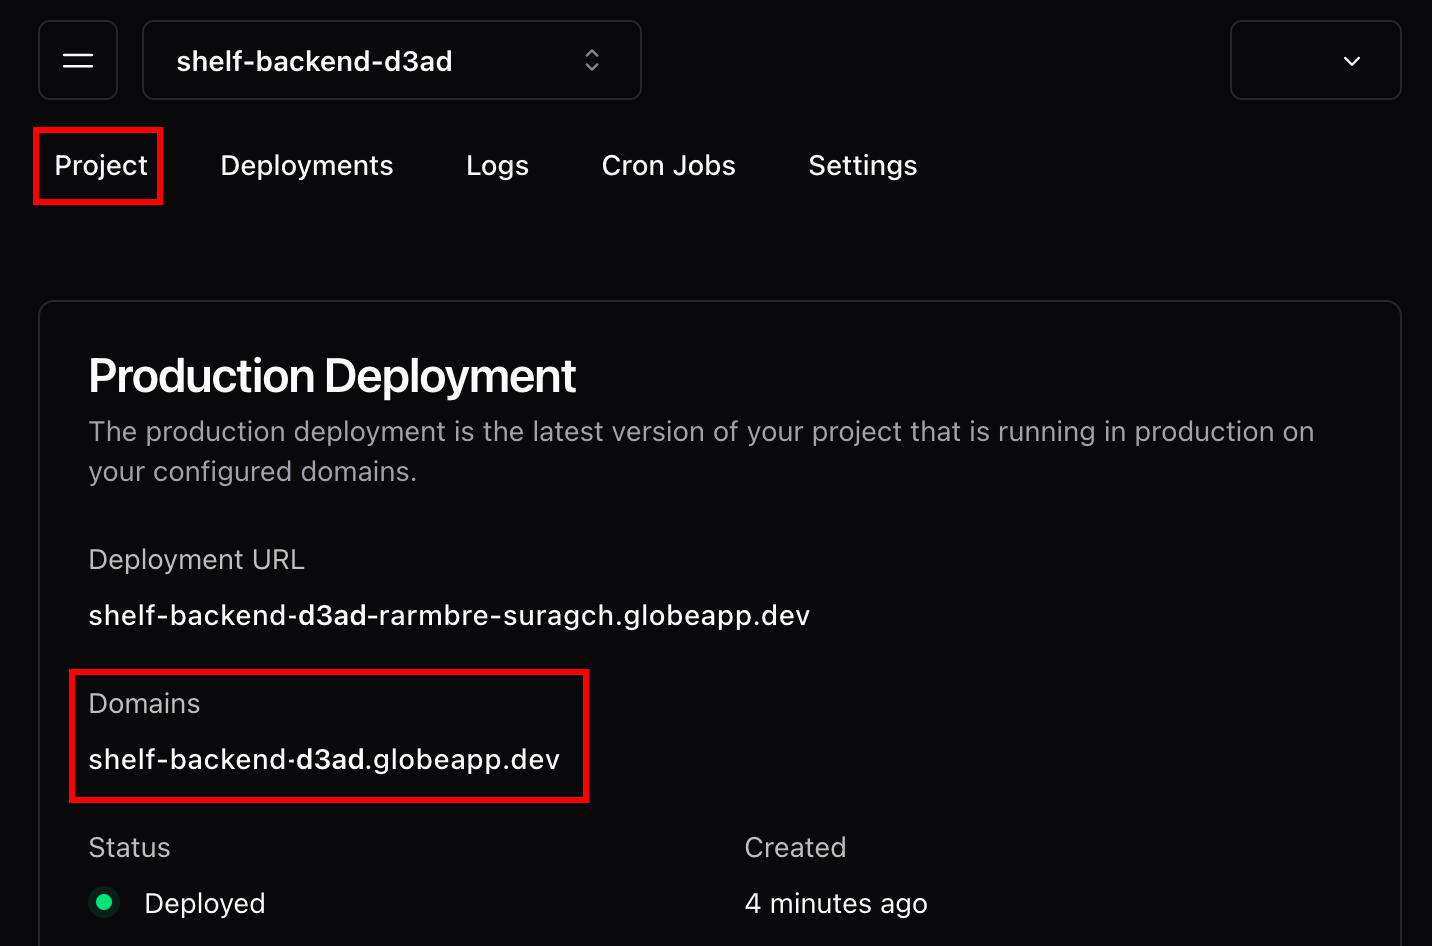
The domain URL is a shortened form of the deployment URL. Copy the domain URL to use in the next step.
Using the Deployment URL on the Flutter Client
With your server now live, adjust your Flutter client to communicate with the new endpoint. In web_client.dart, update the _host variable like so:
class WebClient {
  // * Localhost endpoint for testing
  // String get _host =>
  //    Platform.isAndroid ? 'http://10.0.2.2:8080' : 'http://127.0.0.1:8080';
  // * Production endpoint
  String get _host => 'https://shelf-backend-xxxx.globeapp.dev';
  ...
}
Make sure you're using https and omit the /tip path here.
Note: Currently, Globe does not allow custom domain names. Be cautious about hard-wiring the
globeapp.devdomain into your Flutter app. Once your app is live, this commits you to using Globe, making it challenging to switch providers in the future. As Globe is still maturing, it may not yet meet the demands of a full-scale production app.
Then, you can run the Flutter app once again:
flutter run
If set up correctly, your app should function just as it did locally, now using the live server endpoint:

Streamlining Endpoint Selection with Flavors
Currently, you can switch between local and production endpoints by toggling the _host variable in WebClient:
class WebClient {
  // * Localhost endpoint for testing
  // String get _host =>
  //    Platform.isAndroid ? 'http://10.0.2.2:8080' : 'http://127.0.0.1:8080';
  // * Production endpoint
  String get _host => 'https://shelf-backend-xxxx.globeapp.dev';
  ...
}
However, this setup is error-prone. A more robust solution involves using app flavors to dictate the endpoint dynamically.
A neat way to do this is by introducing a Flavor enum, which can be derived from the appFlavor constant:
import 'package:flutter/services.dart';

enum Flavor { dev, live }

Flavor getFlavor() => switch (appFlavor) {
      'live' => Flavor.live,
      // If flavor is null (not specified), default to dev
      'dev' || null => Flavor.dev,
      _ => throw UnsupportedError('Invalid flavor: $appFlavor'),
    };
Then, the _host variable can be updated accordingly:
class WebClient {
  String get _host => switch (getFlavor()) {
        Flavor.dev =>
          Platform.isAndroid ? 'http://10.0.2.2:8080' : 'http://127.0.0.1:8080',
        Flavor.live => 'https://shelf-backend-xxxx.globeapp.dev',
      };

  ...
}
Now, you can specify the flavor when running your Flutter app:
# For Testing
flutter run --flavor dev
# For Production
flutter run --flavor live
However, you’ll need some additional setup to fully implement flavors on iOS or Android. To learn more about this topic, I recommend these resources:
- Create flavors of a Flutter app
- Simplifying flavor setup in the existing Flutter app: A comprehensive guide
Understanding Latency in Your Server Setup
Remember, your Shelf server is the intermediary between the Flutter app and OpenAI's server:

This architecture keeps your API key secure but introduces additional latency. During testing, the initial request took around 5 seconds, with subsequent requests clocking in at 1.5 to 2 seconds. Measuring the OpenAI request latency from the Shelf server revealed an average of 0.8 seconds. I discussed this with Globe via Discord, and they confirmed that initial delays are due to cold starts in specific regions.
It's important to note that while adding your server layer enhances security, it incurs a slight latency cost, which is a trade-off to consider.
Completed Project on GitHub
You can find the complete source code for the Shelf server and Flutter client on GitHub:
Conclusion
In this tutorial, you built a Flutter app that taps into the OpenAI API without directly exposing your API key. You achieved this by leveraging a Shelf server on Globe to act as a secure conduit.
The beauty of this setup lies in its flexibility. With the AI model and prompt defined server-side, you can switch models or prompts (like swapping to Claude or Gemini) and only update your server. Your Flutter client remains untouched, consistently hitting the same endpoint.
Deploying with Globe was a breeze for our Shelf server, showcasing its potential. Yet, it's important to remember that Globe isn't a one-size-fits-all solution. For projects needing local file-system or database interactions, a VM or VPS might be a more fitting choice — a topic ripe for exploration in another tutorial.
Though Globe is still maturing and not without its quirks, the experience has broadened our grasp of full-stack development using Flutter and Dart Shelf. The landscape of server-side Dart deployment is rich and varied, promising many more learning opportunities ahead.
Happy coding!


