Planning to build a new Flutter app and tasked with making technical decisions? There's a lot to consider.
Assuming there’s a market for the app, and you have a clear value proposition (otherwise, why are you even building the first place 😅), here are some crucial questions:
- How do you flesh out the requirements and decide which features to build?
- How will the design and development process unfold?
- Which technical aspects need to be addressed upfront so you can save time later?
As the technical person in charge, you're likely to encounter these challenges. Do you know how to make informed decisions that keep development on track and within budget?
This article will shed light on these topics, drawing from my background as a solo developer, product owner, and tech lead in small teams (mainly startups and agencies).
This piece is written with Flutter developers in mind — particularly those in small teams that lack clear processes and conventions. While each section could be expanded into its own article, here I just want to share “the big picture”.
While the article is organized as a list of steps, I’m not advocating you should follow them as a rigid process. Some steps may be done in parallel, out of order, or skipped altogether. This is what worked for me, and I hope it will benefit you and your team. 🙂
With that said, let’s get to it! 👇
This article covers important steps that will help you design and build your Flutter app. For advice about releasing your app, read: 6 Key Steps to Take Before Releasing your Next Flutter App.
Step 1: Define the Main UX Flows
In this step, you’ll want to outline the primary user "journeys” in the app.
For example, if you’re building an eCommerce app, the main journeys may be:
- View and search for products in the app
- Add products to the shopping cart and purchase them
- View a list of all the previous orders (as a signed-in user)
Sketching the main UX flows with pen and paper or creating low-fidelity screens in Figma will work well here.

What matters most is that you think about the product with the user in mind.
Indeed, spotting a good UX upfront results in less coding later and will make your app easier to use. 👍
Step 2: Translate UX Flows into Features
Convert each main UX flow into one or more features. If we continue with our eCommerce example, these might be:
- Product Listings: Viewing and searching a list of products
- Product Page: Detailed display of products with images and reviews
- Shopping Cart: Overview of the selected products and quantities
- Checkout flows: Purchasing items and viewing orders
- Authentication: User sign-in and sign-out
Now, I recommend turning these features into detailed "specification documents", explaining what they entail and how they should function. This step provides clarity to collaborators and stakeholders, sets the scope of the project, and is a great opportunity to gather early feedback.
Break down complex features into sub-features for easier planning and execution. These documents can later translate into tasks or issues on GitHub.
With features defined, we can now focus on the data side of things. 👇
Step 3: Understand What Data You Need to Store
Consider each feature identified previously and determine:
- the data you need to display
- the queries you need for data fetching and mutation
- and how data should be secured
For example, looking at the shopping cart feature, you'd need to:
- display all the products and their quantities
- add and remove products
- ensure data privacy (users should only access their cart data)
At this stage, entity-relationship diagrams are quite useful. For instance:
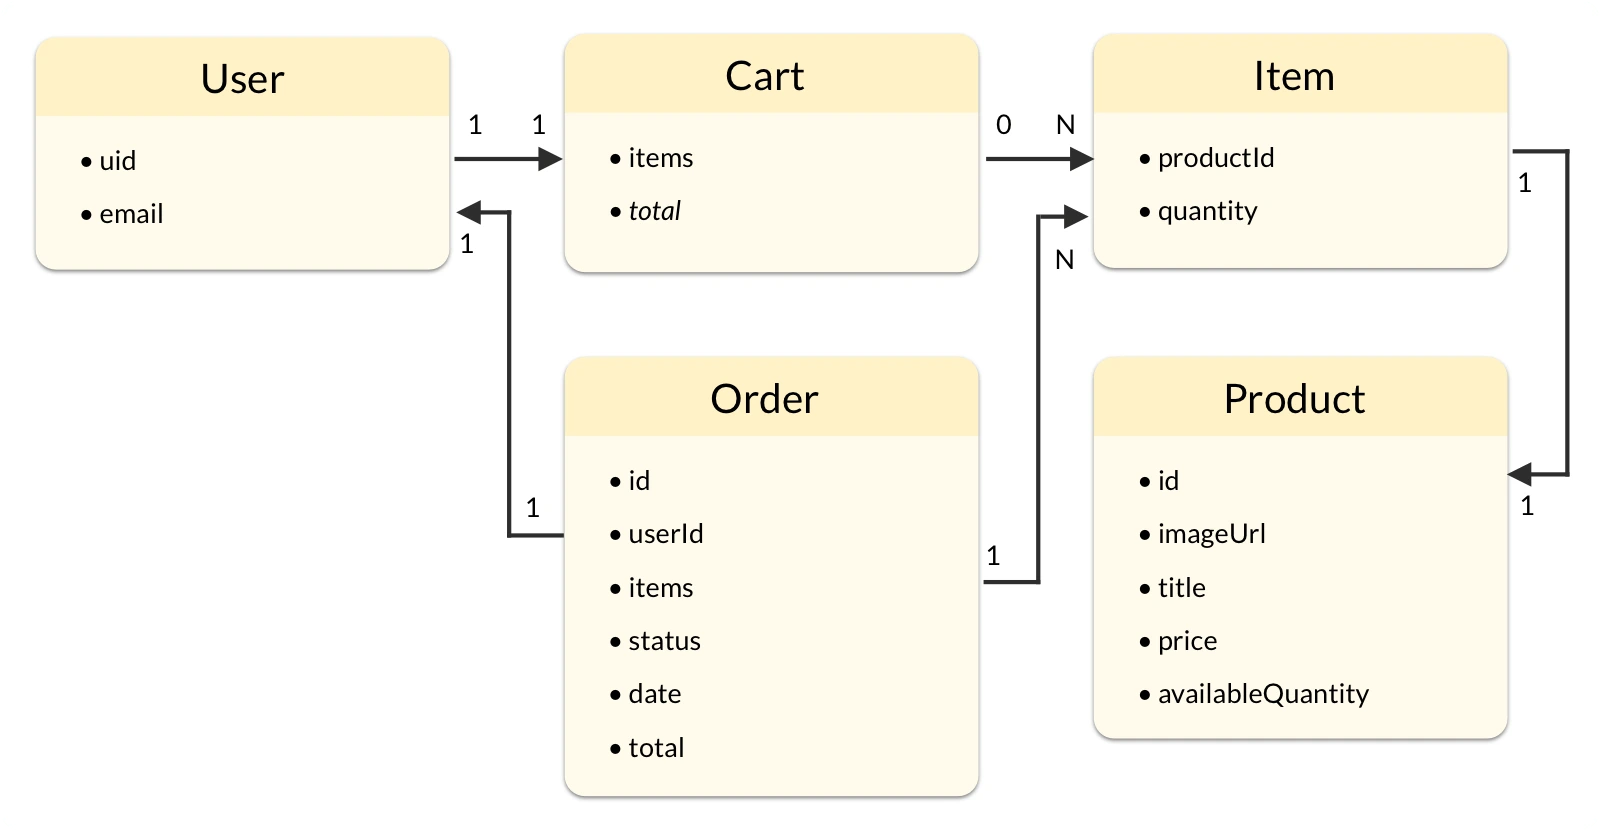
Once you understand your data needs, you can revisit and refine your feature specifications accordingly.
Step 4: Choose Your Backend
For Flutter apps, consider Backend-as-a-Service (BaaS) options like Firebase, Appwrite, Supabase, or even a custom backend.
In choosing a backend, ask yourself:
- Does it offer a good developer experience? (good documentation, ease of integration, good tooling for local development)
- Does it support all your target platforms? (iOS, Android, web, desktop)
- Does it have all the features you need? (e.g. Authentication, Database, File Storage, Cloud Functions, and so on)
- Does it offer caching, realtime updates, good security, and offline mode out of the box?
- Does it integrate well with third-party services you may need?
- How much will it cost at scale?
You’ll only get a real feel for the developer experience by trying things out, and honest opinions from other developers can be valuable too.
Knowing your data requirements upfront will make it easier to choose a backend. For instance, my eCommerce app required an authentication system, a realtime DB, file storage, and Cloud Functions - all available in Firebase. But in choosing Firebase, I made some compromises:
- No native Dart client SDK
- Firebase Cloud Functions can’t be written in Dart
- Limited querying capabilities and no full-text search support
Still, I was able to work around these limitations, and the development experience with the Firebase Local Emulator was very good.
For more details on how to choose a backend, read: Firebase Pros and Cons (for Flutter app development)
Step 5: Decide on App Architecture, State Management, and More
Beyond showing pretty pixels on screen, there are many engineering challenges when building mobile apps:
- App architecture
- State management
- Routing and navigation
- Error handling, analytics, and monitoring
- Accessibility
- Localization
- Automated testing
- Performance
- Compliance, privacy & security
- CI/CD & the build system
It’s good to have a strategy for these aspects before you start writing code.
In particular, choosing (and enforcing) a suitable app architecture and state management solution early on can pay the biggest dividends over time since every part of your codebase depends on them.
App architecture and state management are broad topics, with many options to choose from. After trying many of them over the years, I refined a solution I’m very happy with and use in all my projects. To learn more, read: Flutter App Architecture with Riverpod: An Introduction
Step 6: Create High-Fidelity Designs (Or Not)
Turn those early UX mockups into polished Figma designs.
Key aspects to consider are:
- Choosing a design system (Material / Cupertino / custom)
- Defining the color palette, fonts, icons, and assets that will be used in the app
- Creating responsive designs for various form factors
Note that if you don’t have a designer in your team, you may skip this step altogether (at least initially). In fact, you can get a decent-looking app with the default Material Design widgets.
Just remember: your app exists to solve a big pain point for the user. If you can deliver on that, users will forgive you if it’s not super pretty from the start.
Step 7: Create a GitHub Board and Break Key Features into Tasks
Kanban boards are excellent for outlining roadmaps and tracking progress, and you can use products like Trello or Notion to create one.
My favourite tool for this is GitHub projects, since you can use it to:
- Create project lanes such as “backlog”, “in analysis”, “blocked”, “todo”, “in progress”, “done”
- Add labels for different types of issues
- Add milestones (which are great for internal and external roadmaps)
- Integrate with existing GitHub workflows (PRs, actions, etc.)
Here’s an example board from my eCommerce app:

Each card here represents a GitHub issue or a task that can be addressed with a single pull request.
However, big features are hard to implement as a single task (no one likes to review gigantic PRs).
To address that, I create epics, where each epic corresponds roughly to one top-level feature. These epics house smaller, individual tasks that can be developed in isolation.
Here’s an example epic from another project:

Inside each task, I explain in sufficient detail what needs to be done. Example:

The task description may include:
- A checklist of all the sub-tasks that need to be completed
- A proposed implementation (or if I’m not sure, I ask questions about how to proceed)
- Additional resources that may be useful in completing the task
- Links to the designs (for UI stories)
- Any dependencies on other tasks
- What’s out of scope
If anything is unclear, a discussion can follow, and tasks move to the TODO column once there’s a clear implementation plan.
This method has saved me and my team countless hours since it’s much easier to build the right thing when the requirements are clear.
From my experience, junior developers often need more guidance, while senior developers usually require less. Yet, I always include a checklist so the task requirements are clear.
Step 8: Execution
Here, we write the actual code for each task, adhering to a defined branching strategy (one PR per for each task).
If you work in a team, use code reviews to eliminate oversights. In fact, I often review my code to ensure I haven't forgotten anything (I often do 😅).
What are the Benefits of This Approach?
By following this approach, you’ll have:
- A much better understanding of the application domain
- A clear idea of the UX, UI and data requirements in your app
- Clear directions and conventions on app architecture and state management
- A process for breaking big features into manageable tasks and capturing essential knowledge along the way
If you do this work upfront, you’ll be off on the right foot, and the whole development process will be much smoother.
Is This Approach Too Rigid?
The steps above may appear like a waterfall approach (first do this, then do this, etc.), but it doesn’t have to be that way. Indeed, when building software, requirements change constantly and you must be adaptable.
At times, you’ll want to set all processes aside and hack together a quick prototype.
But when you work on real-world projects over many months or years, it’d be foolish to hack your way in with zero processes in place.
Conclusion
Developing a Flutter app involves numerous steps and considerations. This article dissected each of these steps and provided a practical perspective.
Here are some key steps to follow before you write the first line of code:
- Define and translate the main UX flows into features for optimum user experience.
- Understand the data requirements and make an informed decision when choosing a backend.
- Decide early about app architecture and state management to avoid issues later on.
- Create high-fidelity designs (if you want your app to look good) - though you can still deliver effective solutions without them.
- Make the most of GitHub projects, issues, code reviews, and actions for a smoother and more effective development process.
Adopting a systematic approach doesn't restrict flexibility. Rather, it creates an organized path for change and adaptation, which is vital in software development. Remember that in long-term, substantial projects, processes are your greatest ally.
Happy coding!
Flutter Foundations Course Now Available
I launched a brand new course that covers Flutter app architecture in great depth, along with other important topics like state management, navigation & routing, testing, and much more:


