Platform channels are the gateway to accessing platform-specific code in Flutter.
What do I mean by platform-specific? Here are some examples:
- Access to device inputs (camera, microphone, location, bluetooth, motion sensors)
- Secure storage (a.k.a. Keychain on iOS)
Platform channels are also the basic building block for creating plugins in Flutter.
And while the Dart Packages repository already has a lot of plugins ready to use, you may find yourself in this situation:
- Need to fix a bug on an existing plugin and don't have time to wait for the author to do it?
- Need a specific platform feature for which there is no plugin yet?
Understanding platform channels will make your life easier.
Today I'll show you how to use them to build an image picker, and hook it up to your Flutter app.
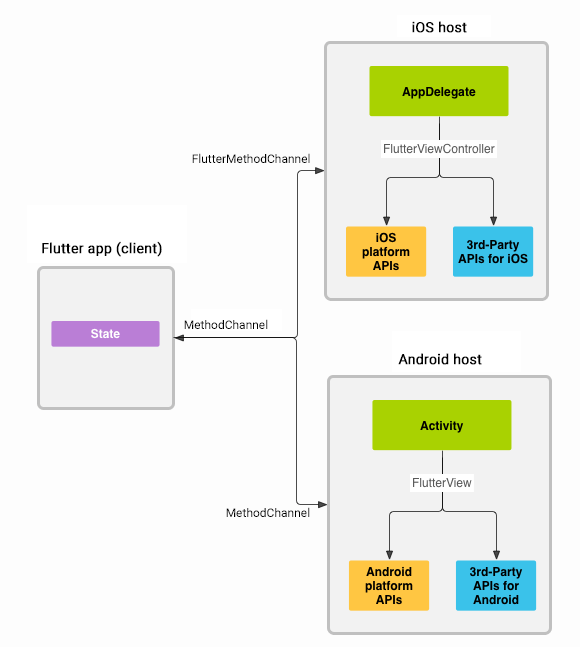
Before we dive in, let's look at the anatomy of an app using platform channels:

If we setup a MethodChannel to talk to the host application, we can access platform and 3rd party native APIs.
Sounds great! Time for an example:
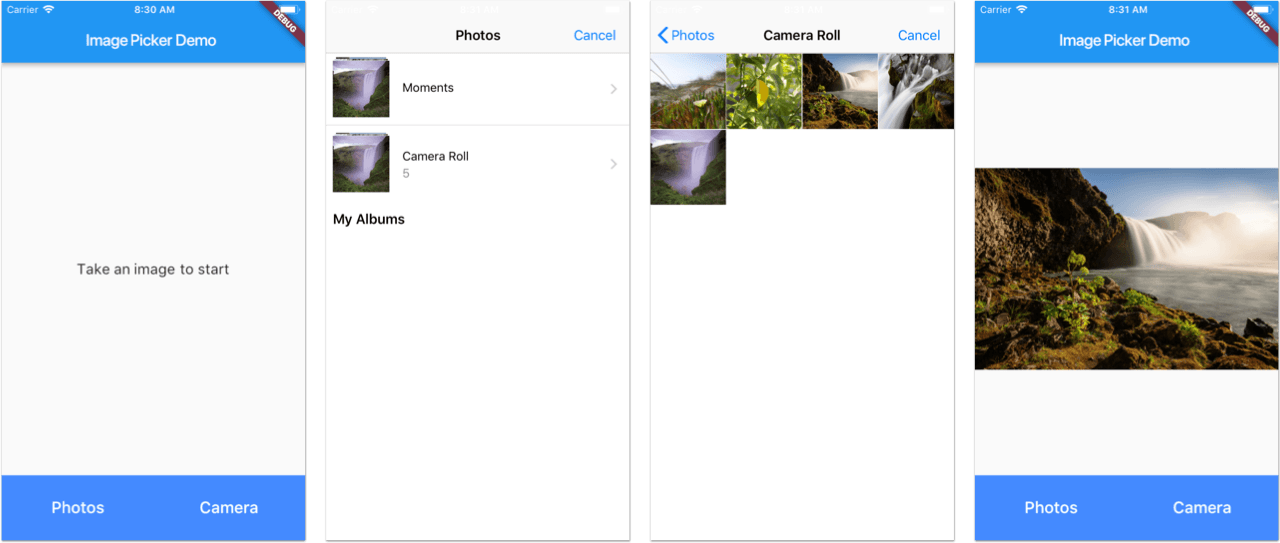
Photos and Camera Image Picker
I'll show you how to build this flow:

Let's start by creating an ImagePickerChannel that we will use to interface with the native host:
import 'dart:async';
import 'dart:io';

import 'package:flutter/material.dart';
import 'package:flutter/services.dart';

enum ImageSource {
  photos,
  camera
}

String _stringImageSource(ImageSource imageSource) {
  switch (imageSource) {
    case ImageSource.photos: return 'photos';
    case ImageSource.camera: return 'camera';
  }
}

abstract class ImagePicker {
  Future<File> pickImage({ImageSource imageSource});
}

class ImagePickerChannel implements ImagePicker {

  static const platform = const MethodChannel('com.musevisions.flutter/imagePicker');

  Future<File> pickImage({ImageSource imageSource}) async {

    var stringImageSource = _stringImageSource(imageSource);
    var result = await platform.invokeMethod('pickImage', stringImageSource);
    if (result is String) {
      return new File(result);
    } else if (result is FlutterError) {
      throw result;
    }
    return null;
  }
}
This works as follows:
- We create a
MethodChanneland give it a name. - Inside the
pickImage()method, we callplatform.invokeMethod(), passingpickImageas a name, andcameraorphotosas the image source. - We then parse the result, which will be either a
Stringrepresenting a file path, or aFlutterErrorif something went wrong. - Finally, we return a
Filewith our image path (this can be rendered withImage.file), or throw an error if anything went wrong.
Note that the result could be anything. In fact, the invokeMethod() call returns Future<dynamic>. In creating the channel for our image picker, we define a contract that requires the host app to return either String or FlutterError.
Time to jump over to the native code. Let's take a look at how this works on iOS.
Implementing the image picker on iOS
We are going to need a few ingredients.
The first is a simple wrapper for UIImagePickerController, which specifies a sourceType and a completion handler:
class ImagePickerController: UIImagePickerController, UINavigationControllerDelegate, UIImagePickerControllerDelegate {

  var handler: ((_ image: UIImage?) -> Void)?

  convenience init(sourceType: UIImagePickerControllerSourceType, handler: @escaping (_ image: UIImage?) -> Void) {
    self.init()
    self.sourceType = sourceType
    self.delegate = self
    self.handler = handler
  }

  func imagePickerController(_ picker: UIImagePickerController, didFinishPickingMediaWithInfo info: [String : Any]) {
    handler?(info[UIImagePickerControllerOriginalImage] as? UIImage)
  }

  func imagePickerControllerDidCancel(_ picker: UIImagePickerController) {
    handler?(nil)
  }
}
Then, we're going to create a FlutterChannelManager class. I'll show you the code first, then explain it:
class FlutterChannelManager: NSObject, UINavigationControllerDelegate, UIImagePickerControllerDelegate {

  let channel: FlutterMethodChannel
  unowned let flutterViewController: FlutterViewController

  init(flutterViewController: FlutterViewController) {

    self.flutterViewController = flutterViewController
    // 1. create channel
    channel = FlutterMethodChannel(name: "com.musevisions.flutter/imagePicker", binaryMessenger: flutterViewController)
  }

  func setup() {
    // 2. set method call handler
    channel.setMethodCallHandler { (call, result) in
      // 3. check call method and arguments
      switch call.method {
      case "pickImage":
        let sourceType: UIImagePickerControllerSourceType = "camera" == (call.arguments as? String) ? .camera : .photoLibrary
        // 4. do work and call completion handler (result)
        let imagePicker = self.buildImagePicker(sourceType: sourceType, completion: result)
        self.flutterViewController.present(imagePicker, animated: true, completion: nil)
      default:
        break
      }
    }
  }

  func buildImagePicker(sourceType: UIImagePickerControllerSourceType, completion: @escaping (_ result: Any?) -> Void) -> UIViewController {
    if sourceType == .camera && !UIImagePickerController.isSourceTypeAvailable(.camera) {
      let alert = UIAlertController(title: "Error", message: "Camera not available", preferredStyle: .alert)
      alert.addAction(UIAlertAction(title: "OK", style: .default) { action in
        completion(FlutterError(code: "camera_unavailable", message: "camera not available", details: nil))
      })
      return alert
    } else {
      return ImagePickerController(sourceType: sourceType) { image in
        self.flutterViewController.dismiss(animated: true, completion: nil)
        if let image = image {
          completion(self.saveToFile(image: image))
        } else {
          completion(FlutterError(code: "user_cancelled", message: "User did cancel", details: nil))
        }
      }
    }
  }

  private func saveToFile(image: UIImage) -> Any {
    guard let data = UIImageJPEGRepresentation(image, 1.0) else {
      return FlutterError(code: "image_encoding_error", message: "Could not read image", details: nil)
    }
    let tempDir = NSTemporaryDirectory()
    let imageName = "image_picker_\(ProcessInfo().globallyUniqueString).jpg"
    let filePath = tempDir.appending(imageName)
    if FileManager.default.createFile(atPath: filePath, contents: data, attributes: nil) {
      return filePath
    } else {
      return FlutterError(code: "image_save_failed", message: "Could not save image to disk", details: nil)
    }
  }
}
This works as follows:
- We pass in a
FlutterViewController. When building Flutter apps, the root view controller of the iOS app is always an instance of this class. - We register a
FlutterMethodChannel, using ourflutterViewControlleras abinaryMessenger. This is needed to communicate across the channel. - In the
setup()method, we add our method call handler. We can use thecall.methodandcall.argumentsstrings as inputs to determine what action the Flutter app wants to take. - In this case we recognize the
pickImagemethod, and determine thesourceTypeto be eithercameraorphotos. - We then build and present our image picker, which either shows the photo gallery or the camera capture screen. This includes a check for
isSourceTypeAvailable(.camera)as camera capture is not supported on the iOS Simulator. - If an image is retrieved, it is saved to the temporary directory and a path to its file is returned.
- On completion, we pass back the file path or any error to the channel.
Note how the image is saved to a file, and its file path is passed back as a result. As we have seen in the Flutter code, this is then used to retrieve the file and render it as an Image.
An alternative approach would be to decode the image into a byte array, and pass this along with the width, height and scale across the channel. In this configuration, the Flutter app can then reconstruct the image via Image.memory.
Finally, our AppDelegate:
@UIApplicationMain
@objc class AppDelegate: FlutterAppDelegate {

  var flutterChannelManager: FlutterChannelManager!

  override func application(
    _ application: UIApplication,
    didFinishLaunchingWithOptions launchOptions: [UIApplicationLaunchOptionsKey: Any]?
    ) -> Bool {
    GeneratedPluginRegistrant.register(with: self)

    guard let controller = window.rootViewController as? FlutterViewController else {
      fatalError("Invalid root view controller")
    }
    flutterChannelManager = FlutterChannelManager(flutterViewController: controller)
    flutterChannelManager.setup()

    return super.application(application, didFinishLaunchingWithOptions: launchOptions)
  }
}
Phew. That was quite a bit of code setup - most of it is boilerplate code to hook up the native image picker and saving to file.
Using platform channels is actually quite simple and boils down to this:
// 1. create channel
channel = FlutterMethodChannel(name: "com.musevisions.flutter/imagePicker", binaryMessenger: flutterViewController)
// 2. setup method call handler
channel.setMethodCallHandler { (call, result) in
  // 3. switch on method and (optionally) arguments
  switch call.method {
  case "pickImage":
    // do some work, then:
    // 4. call completion handler
    result(data)
  default:
    break
}
One final note for iOS. As our app accesses the camera, it is required to add a NSCameraUsageDescription key to the Info.plist file, as described on the Apple Docs.
What about Android?
Well, I'm no Android expert. But you know what?
Flutter already ships with an official image picker plugin. You can inspect the code and see how it's done.
Here is the GitHub repo for this project. Enjoy!
Conclusion
In this post I explained how platform channels work.
You can use them:
- to hook up your Flutter apps to platform-specific APIs
- as a stepping stone to build your own plugins
And before you roll your own, make sure to check for existing plugins on pub.dartlang.org first.
Happy coding!


