This is a free lesson from my Flutter Animations course, where you'll learn how to build multiple projects, including a clone of the iOS stopwatch app.
Have you ever needed a Flutter widget that updates every frame?
If the answer is yes and you have used the Timer class to do this, read along as I'm about to show you a better solution.
Stopwatch App UI
Suppose that you wanted to create this stopwatch UI, along with start/stop functionality:
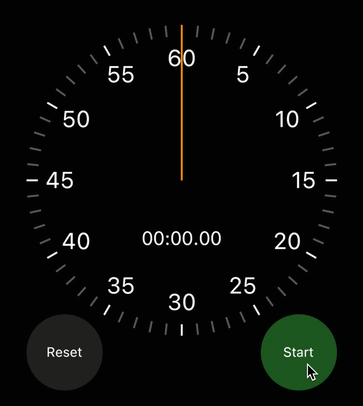
How would you do it?
To be precise, how would you make the elapsed time label and clock hand update every frame?
One possible way of doing this is to update the UI periodically using a Timer object. This video explains how:
Timer: Key Points
To update the UI at regular intervals we can create a StatefulWidget and configure a Timer inside initState():
class _StopwatchState extends State<Stopwatch> {
  late DateTime _initialTime;
  // 1. declare a Timer
  late final Timer _timer;
  Duration _elapsed = Duration.zero;
  @override
  void initState() {
    super.initState();
    _initialTime = DateTime.now();
    // 2. initialize it
    _timer = Timer.periodic(Duration(milliseconds: 50), (_) {
      // 3. get the current time
      final now = DateTime.now();
      // 4. update the state (elapsed time)
      setState(() {
        _elapsed = now.difference(_initialTime);
      });
    });
  }

  @override
  void dispose() {
    // 5. don't forget to cancel the timer
    _timer.cancel();
    super.dispose
  }

  @override
  Widget build(BuildContext context) {
    // 6. pass the elapsed time to a widget
    // that shows the formatted text as mm:ss:hh
    return ElapsedTimeText(elapsed: _elapsed);
  }
}
Note about the late keyword
The code above uses late keyword. late is useful when variable initialization happens after its declaration, but the variable is guaranteed to be non-null by the time it's used.
This is true for the _initialTime and _timer variables above, because initState() is guaranteed to be called before the build() and dispose() methods.
Take-away: use
latewhen declaring variables that are set to a non-null value ininitState(). See my tutorial about Null Safety for more details.
A better approach: using a Ticker
Using a Timer for periodic UI updates "kind-of" works, but is not precise and has some drawbacks.
What we really need is a Ticker. This lesson covers all the details:
Ticker: Key Points
Internally, Flutter uses a scheduler that renders the screen at 60 frames per second.
When the state of our application changes (via setState() or other means) and Flutter determines that it needs to update the UI, it will do so in the next scheduled frame.
Tickers
We can think of Ticker as a special periodic timer that we can use to be notified when the Flutter engine is about to draw a new frame.
To create a ticker, we need to add a SingleTickerProviderStateMixin to our State subclass. Here's an updated implementation:
class _StopwatchState extends State<Stopwatch>
    // 1. add SingleTickerProviderStateMixin
    with SingleTickerProviderStateMixin {

  Duration _elapsed = Duration.zero;
  // 2. declare Ticker
  late final Ticker _ticker;
  @override
  void initState() {
    super.initState();
    // 3. initialize Ticker
    _ticker = this.createTicker((elapsed) {
      // 4. update state
      setState(() {
        _elapsed = elapsed;
      });
    });
    // 5. start ticker
    _ticker.start();
  }

  @override
  void dispose() {
    // 6. don't forget to dispose it
    _ticker.dispose();
    super.dispose();
  }

  @override
  Widget build(BuildContext context) {
    // 7. pass the elapsed time to a widget
    // that shows the formatted text as mm:ss:hh
    return ElapsedTimeText(elapsed: _elapsed);
  }
}
Advantages of Ticker over Timer
- because
Tickeruses the refresh rate of the screen, we can update the UI every time Flutter renders a new frame. - the
Tickercallback is only called when the widget is currently visible
Take away: Flutter animations use tickers, because they provide a reliable way of updating the UI at 60 frames per second.
This is true both for implicit animations and explicit animations. In fact, we need a TickerProvider in order to create an AnimationController.
Flutter Animations Course
If you're serious about animations and want to learn how to use them in a real-world app, check out my complete Flutter Animations course.
This will teach you how to build a habit-tracking application with completely custom UI and animations. And it includes 7 hours of in-depth content, full source code, extra challenges & much more.
Happy coding!


