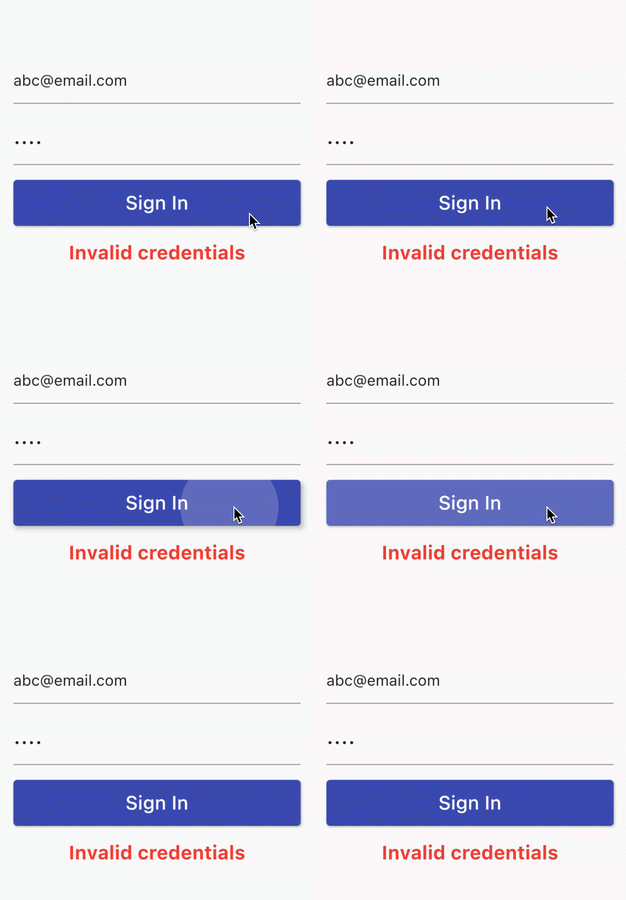
I really love how Flutter animations can be used to improve usability.
Here's an example showing a Text widget that shakes when some error occurs.

The Flutter animation APIs make it very easy to implement this. Here's a step-by-step guide. 👇
1. Create a custom sine curve
The effect is accomplished using an AnimationController and a custom curve based on the sine function.
First of all, here's a SineCurve that repeats the sine function count times over a 2 * pi period.
// 1. custom Curve subclass
class SineCurve extends Curve {
  SineCurve({this.count = 3});
  final double count;

  // 2. override transformInternal() method
  @override
  double transformInternal(double t) {
    return sin(count * 2 * pi * t);
  }
}
Since
SineCurveis aCurvesubclass, it can be given as an argument to any implicitly animated widget.
2. Abstract the AnimationController boilerplate code
We'll need an AnimationController to get the effect we want. To reduce the boilerplate code, let's define a State subclass:
abstract class AnimationControllerState<T extends StatefulWidget>
    extends State<T> with SingleTickerProviderStateMixin {
  AnimationControllerState(this.animationDuration);
  final Duration animationDuration;
  late final animationController = AnimationController(
    vsync: this,
    duration: animationDuration
  );

  @override
  void dispose() {
    animationController.dispose();
    super.dispose();
  }
}
For more details about this technique, see: How to reduce AnimationController boilerplate code: Flutter Hooks vs extending the State class
3. Create a custom ShakeWidget
Let's define a StatefulWidget subclass that takes a child widget along with some customizable properties:
class ShakeWidget extends StatefulWidget {
  const ShakeWidget({
    Key? key,
    required this.child,
    required this.shakeOffset,
    this.shakeCount = 3,
    this.shakeDuration = const Duration(milliseconds: 500),
  }) : super(key: key);
  // 1. pass a child widget
  final Widget child;
  // 2. configurable properties
  final double shakeOffset;
  final int shakeCount;
  final Duration shakeDuration;

  // 3. pass the shakeDuration as an argument to ShakeWidgetState. See below.
  @override
  ShakeWidgetState createState() => ShakeWidgetState(shakeDuration);
}
4. Create a custom CurvedAnimation
Let's define the ShakeWidgetState class with a custom animation:
// note: ShakeWidgetState is public
class ShakeWidgetState extends AnimationControllerState<ShakeWidget> {
  ShakeWidgetState(Duration duration) : super(duration);
  // 1. create a Tween
  late Animation<double> _sineAnimation = Tween(
    begin: 0.0,
    end: 1.0,
    // 2. animate it with a CurvedAnimation
  ).animate(CurvedAnimation(
    parent: animationController,
    // 3. use our SineCurve
    curve: SineCurve(count: widget.shakeCount.toDouble()),
  ));
}
5. Use the animation with AnimatedBuilder and Transform.translate
Let's define a build() method with a custom AnimatedBuilder:
@override
Widget build(BuildContext context) {
  // 1. return an AnimatedBuilder
  return AnimatedBuilder(
    // 2. pass our custom animation as an argument
    animation: _sineAnimation,
    // 3. optimization: pass the given child as an argument
    child: widget.child,
    builder: (context, child) {
      return Transform.translate(
        // 4. apply a translation as a function of the animation value
        offset: Offset(_sineAnimation.value * widget.shakeOffset, 0),
        // 5. use the child widget
        child: child,
      );
    },
  );
}
Note how we're passing
_sineAnimationas an argument to theAnimatedBuilder, and also use it to calculate the offset value. See below for an alternative approach.
6. Add a status listener to reset the animation when complete
As we want to "play" the animation many times, we need to reset the AnimationController when the animation is complete:
@override
void initState() {
  super.initState();
  // 1. register a status listener
  animationController.addStatusListener(_updateStatus);
}

@override
void dispose() {
  // 2. dispose it when done
  animationController.removeStatusListener(_updateStatus);
  super.dispose();
}

void _updateStatus(AnimationStatus status) {
  // 3. reset animationController when the animation is complete
  if (status == AnimationStatus.completed) {
    animationController.reset();
  }
}
7. Add a shake() method
Our ShakeWidgetState class needs a shake() method that we can call from outside to start the animation:
// note: this method is public
void shake() {
  animationController.forward();
}
8. Control the ShakeWidget with a GlobalKey
In the parent widget we can declare a GlobalKey<ShakeWidgetState>, and use it to call shake() when a button is pressed.
class MyHomePage extends StatelessWidget {
  // 1. declare a GlobalKey
  final _shakeKey = GlobalKey<ShakeWidgetState>();

  @override
  Widget build(BuildContext context) {
    return Column(
      children: [
        // 2. shake the widget via the GlobalKey when a button is pressed
        ElevatedButton(
          child: Text('Sign In', style: TextStyle(fontSize: 20)),
          onPressed: () => _shakeKey.currentState?.shake(),
        ),
        // 3. Add a parent ShakeWidget to the child widget we want to animate
        ShakeWidget(
          // 4. pass the GlobalKey as an argument
          key: _shakeKey,
          // 5. configure the animation parameters
          shakeCount: 3,
          shakeOffset: 10,
          shakeDuration: Duration(milliseconds: 400),
          // 6. Add the child widget that will be animated
          child: Text(
            'Invalid credentials',
            textAlign: TextAlign.center,
            style: TextStyle(
                color: Colors.red, fontSize: 20, fontWeight: FontWeight.bold),
          ),
        ),
      ],
    );
  }
}
Here's the final result (with a slightly more interesting UI):

Final Notes: implicit vs explicit animations
The SineCurve class we created is a Curve subclass, so it can be given as an argument to any implicitly animated widget.
In this example, we used it to create a custom CurvedAnimation that is passed as an argument to our AnimatedBuilder.
But since we're using an explicit animation, we don't need the SineCurve or even the _sineAnimation to start with. In fact, we can get the same result by calculating the sine value directly inside the AnimatedBuilder code:
@override
Widget build(BuildContext context) {
  // 1. return an AnimatedBuilder
  return AnimatedBuilder(
    // 2. pass the AnimationController as an argument
    animation: animationController,
    // 3. optimization: pass the given child as an argument
    child: widget.child,
    builder: (context, child) {
      // 4. calculate the sine value directly
      final sineValue =
          sin(widget.shakeCount * 2 * pi * animationController.value);
      return Transform.translate(
        // 5. apply a translation as a function of the animation value
        offset: Offset(sineValue * widget.shakeOffset, 0),
        // 6. use the child widget
        child: child,
      );
    },
  );
}
Here's the full source code for this example:
That's it. Now go ahead and shake your widgets! 😎
Happy coding!


